It’s Time to Learn How to Do Some Productive Work

Our previous installments of the Cooking with Python and KBpedia series relied on the full knowledge graph, kbpedia_reference_concepts.owl. That approach was useful to test out whether our current Python and Jupyter Notebook configurations were adequate to handle the entire 58,000 reference concepts (RCs) in KBpedia. However, a file that large makes finding and navigating stuff a bit harder. For this installment, and a few that come thereafter, we will restrict our example to the much smaller upper ontology to KBpedia, KKO (Kbpedia Knowledge Ontology). This ontology only has hundreds of concepts, but has the full suite of functionality and component types found in the full system.
In today’s installment we will apply some of the basic commands in owlready2 we learned in the last installment. Owlready2 is the API to our OWL2 knowledge graphs. In today’s installment we will explore the standard CRUD (create-read-update-delete) actions against the classes (reference concepts) in our graph. Since our efforts to date have focused on the R in CRUD (for reading), our emphasis today will be on class creation, updates and deletions.
Remember, you may find the KKO reference file that we use for this installment, kko.owl where you first stored your KBpedia reference files. (What I call main in the code snippet below.)
Load KKO
Local File Option
Like in the last installment, we will follow good practice and use an absolute file or Web address to identify our existing ontology, KKO in this case. Unlike the last installment, we will comment out the little snippet of code we added to provide screen feedback that the file is properly referenced. (If you have any doubts, remove the comment character (#) to restore the feedback):
main = 'C:/1-PythonProjects/kbpedia/sandbox/kko.owl'
# with open(main) as fobj:                         # we are not commenting out the code to scroll through the file
#    for line in fobj:
#        print (line)
Again, you shift+enter or pick Run from the main menu to execute the cell contents. (If you chose to post the code lines to screen, you may clear the file listing from the screen by choosing Cell → All Output → Clear.)
We will next consolidate multiple steps from the prior installment to make absolute file references for the imported SKOS ontology and then to actually load the files:
skos_file = 'http://www.w3.org/2004/02/skos/core'

from owlready2 import *
kko = get_ontology(main).load()

skos = get_ontology(skos_file).load()
kko.imported_ontologies.append(skos)
MyBinder Option
If you are running this notebook online, do NOT run the above routines, since we will use the GitHub files, but now consolidate all steps into a single cell:
kko_file = 'https://raw.githubusercontent.com/Cognonto/CWPK/master/sandbox/builds/ontologies/kko.owl'
skos_file = 'http://www.w3.org/2004/02/skos/core'

from owlready2 import *
kko = get_ontology(main).load()

skos = get_ontology(skos_file).load()
kko.imported_ontologies.append(skos)
Check Load Results
OK, no matter which load option you used, we can again test to see if the ontologies registered in the system, only now specifying two base IRIs in a single command:
print(kko.base_iri,skos.base_iri)http://kbpedia.org/ontologies/kko# http://www.w3.org/2004/02/skos/core#
We can also confirm that the two additional ontologies have been properly imported:
print(kko.imported_ontologies)[get_ontology("http://www.w3.org/2004/02/skos/core#")]
Re-starting the Notebook
I have alluded to it before, but let’s now be explicit about how to stop-and-start a notebook, perhaps just to see whether we can clear memory and test whether all steps up to this point are working properly. To do so, go to File → Save and Checkpoint, and then File → Close and Halt. (You can insert a Rename step in there should you wish to look at multiple versions of what you are working on.)
Upon closing, you will be returned to the main Jupyter Notebook directory screen, where you can navigate to the active file, click on it, and then after it loads, Run the cells up to this point to reclaim your prior working state.
Inspecting KKO Contents
So, we threw some steps in the process above to confirm that we were finding our files and loading them. We can now check to see if the classes have loaded properly since remaining steps focus on managing them:
list(kko.classes())Further, we know that KKO has a class called Products. We also want to see if our file load has properly captured its subClassOf relationships. (In its baseline configuration KKO Products has three sub-classes: Primary ..., Secondary ..., and Tertiary ....) We will return to this cell below multiple times to confirm some of the later steps:
list(kko.Products.subclasses())[kko.PrimarySectorProduct,
kko.SecondarySectorProduct,
kko.TertiarySectorService]Create a New Class
‘Create’ is the first part of the CRUD acronym. There are many ways to create new objects in Python and Owlready2. This section details three different examples. As you interact with these three examples, you may want to go back up to the cell above and test the list(kko.Products.subclasses()) code against the method.
The first example defines a class WooProduct that it assigns as a subclass of Thing (the root of OWL), and then we assign the class to the Products class. Note that in the second cell of this method we assign a value of ‘pass‘ to it, which is a Python convention for enabling an assignment without actual values as a placeholder for later use. You may see the ‘pass‘ term frequently used as scripts set up their objects in the beginning of programs.
class WooProducts(Thing):
     namespace = kko
class WooProducts(kko.Products):
passIn the second method, we bypass the initial Thing assignment and directly assign the new class WooFoo:
class WooFoo(kko.Products):
     namespace = kko
In the third of our examples, we instead use the native Python method of ‘types‘ to do the assignment directly. This can be a useful approach when we are wanting to process longer lists of assignments directly:
import types

with kko:
    ProductsFoo = types.new_class("ProductsFoo", (kko.Products,))
Update a Class
Unfortunately, there is no direct ‘edit‘ or ‘update‘ function in Owlready2. At the class level one can ‘delete‘ (or ‘destroy‘) a class (see below) and then create a new one, granted a two-step process. For properties, including class relationships such as subClassOf, there are built-in methods to ‘.append‘ or ‘.remove‘ the assignment without fully deleting the class or individual object. In this case, we remove WooProducts as a subClassOf Products:
WooProducts.is_a.remove(kko.Products)Since updates tend to occur more for object properties and values, we discuss these options further two installments from now.
Delete a Class
Deletion occurs through a ‘destroy’ function that completely removes the object and all of its references from the ontology.
destroy_entity(WooProducts)Of course, other functions are available for the use of classes and individuals. See the Additional Documentation below for links explaining these options.
Save the Changes
When all of your desired changes are made programmatically or via an interactive session such as this one, you are then ready to save the knowledge graph out for re-use. It is generally best to write out the modified ontology under a new file name to prevent overwriting your prior version. If, after inspection, you like your changes and see no problems, you can then re-name this file back to the original name and now make it your working version going forward (of course, use the file location of your own choice).
kko.save(file = "C:/1-PythonProjects/kbpedia/sandbox/kko-test.owl", format = "rdfxml")Note during a save specification that you may also indicate the format of the written ontology. We have been using ‘rdfxml‘ as our standard format, but you may also use ‘ntriples‘ (or others that may arise over time for the application).
Inspect in Protege
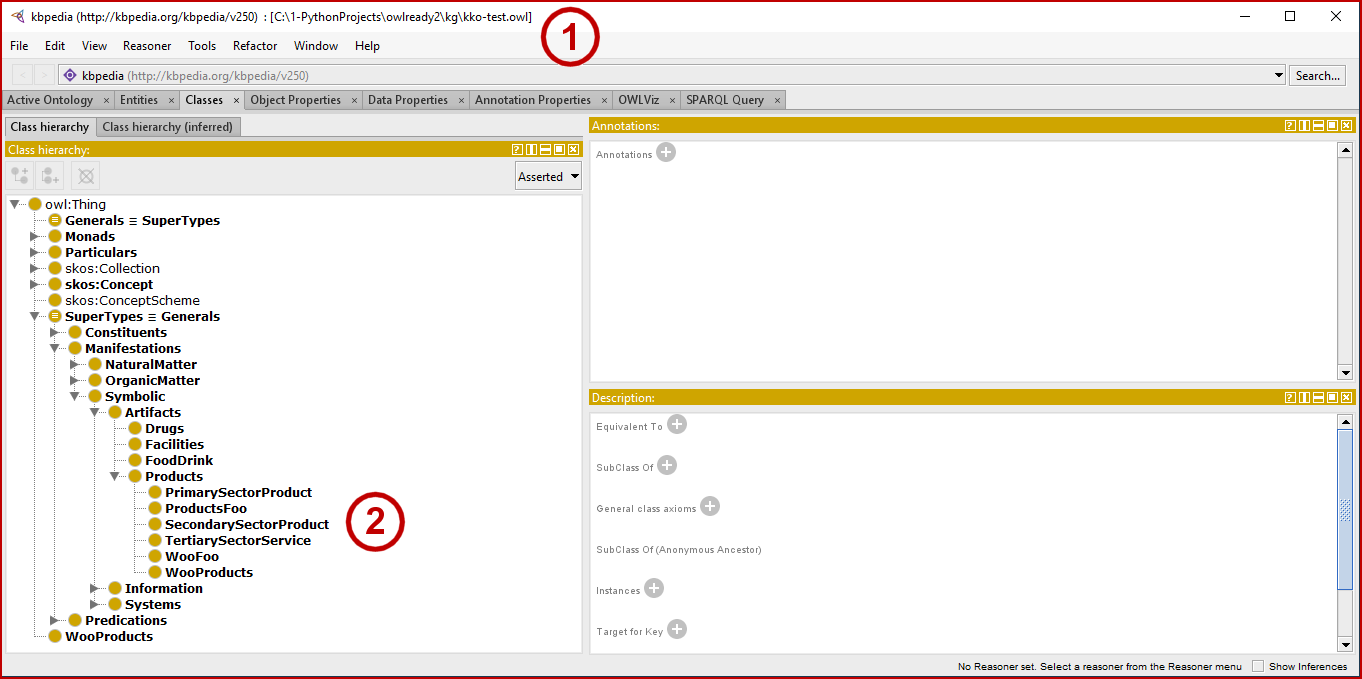
OK, so after saving we can inspect our new file to make sure that all of the class changes above are now accurately reflected in the formal ontology. Here is the class view for Products:

We can see that our file now has the updated file name (1), and the added classes appear in the KKO ontology (2).
As the use of Protege proves, our changes have been written to our formal ontology correctly. If we so chose, we can now re-name back to our working file, and continue on with our work. Of course, after doing such checks beginning in our process or when we introduce new major wrinkles, we can gain confidence everything is working properly and skip labor-intensive checks as appropriate.
Additional Documentation
Owlready2 has relevant additional documentation, with examples, for:
*.ipynb file. It may take a bit of time for the interactive option to load.


