


How to Process Your Own Large Libraries into Thumbnails
When I decided to upgrade my Sweet Tools semantic Web and -related tools listing, I wanted to add some images to make the presentation more attractive. It was also becoming the case that many metadata aggregation service providers were adopting image representations for data (see this Dlib article). Since the focus of my listing is software, I either could install all of the programs and take screenshots (not doable given the numbers involved) or adopt what many others have used as a sort of visual index for content: thumbnails, or, as specifically called when applied to Web pages, thumbshots.
Quick Review of Alternatives
Unless you get all of your Web content via feeds or have been living in a cave, you may have recently contracted a form of popup vertigo. Since its introduction just a few months back, the Snap Preview Anywhere thumbnail popup has become the eggplant that eats Chicago, with more than a half million sites now reported to be using the service. Since I don’t want this service myself for my blog (see below) and I therefore did not want to go through the effort of signing up for SPA nor restricting its use to just this posting (even though the signup appears clean and straightforward), I reproduce below what one of these Snap link-over popups looks like:

The sheer ubiquity of these popup thumbnails is creating its own backlash (check out this sample rant from UNEASYsilence and its comments) and, early promoters, such as TechCrunch, have now gone to the use of a clickable icon [ ![]() ] for a preview, rather than automatically popping up the image from the link hover.
] for a preview, rather than automatically popping up the image from the link hover.
Not only had the novelty of these popups worn off for me, but my actual desired use for Sweet Tools was to present a gallery of images for multiple results simultaneously. So, besides its other issues, the Snap service was not suitable for my purpose.
I had earlier used a Firefox add-on called BetterSearch that places thumbnails on results pages when doing searches with Google (including international versions), Amazon, MSN Search, Yahoo!, A9, Answers.com, AllTheWeb, Dogpile.com, del.icio.us and Simpy.com. But, like the Snap service, I personally found this service to be distracting. I also don’t like the fact that my use was potentially being logged and promo messages were inserted on each screen. (There is another Firefox browser extension called GooglePreview that appears less intrusive, but I have not tried it.) As it turns out, both of these services themselves piggyback on a free (for some uses) thumbnail acquisition and server service from Thumbshots.org.
Since my interest in thumbnails was limited and focused to a bounded roster of sites (not the dynamic results from a search query), I decided to cut out the middleman and try the Thumbshots.org source directly myself. However, my candidate sites are mostly obscure academic ones or semantic Web ones not generally in the top rankings, meaning that most of the Sweet Tools Web sites unfortunately had no thumbnails on Thumbshots.org.
Of course, throughout these investigations, I had always had the option of taking physical screen captures myself and converting them manually to thumbnails. This is a very straightforward process with standard graphics packages; I had done so often for other purposes using my standard Paint Shop Pro software. But with the number of the Sweet Tools growing into the hundreds, such a manual approach clearly wouldn’t scale.
Knowing there are literally hundreds of cheap or free graphics and image manipulation programs out there, I thus set out to see if I could find a utility that would provide most, if not all, of the automation required.
My Sweet Tools records don’t change frequently, so I could accept a batch mode approach. I wanted to also size the thumbnails to whatever displayed best in my Exhibit presentation. As well, if I was going to adopt a new utility, I decided I might as well seek other screen capture and display flexibilities for other purposes. I also importantly needed the individual file names created to be unique and readable (not just opaque IDs). Finally, like any tool I ultimately adopt, I wanted quality output and professional design.
Off and on I reviewed options and packages, mostly getting disgusted with the low quality of the dross that mostly exists out there, and appalled at the difficulty in using standard search services to find such candidates. (There truly is becoming whole categories of content such as products of all types, reviews, real data, market info and statistics, that are becoming nearly impossible to effectively find on the Web with current search engines; but those are topics for another day.)
Nonetheless, after much looking and trial runs of perhaps a dozen packages, I finally stumbled across a real gem, WebShot. (Reasons this product was difficult to find included its relatively recent vintage, apparent absence of any promotion, and the mismatch between the product name and Web site name.)
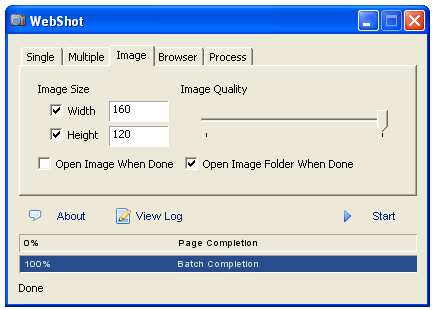
The WebShot Utility
WebShot is a program that allows you to take screenshots and thumbnails of web pages or whole websites. I find its GUI easy to use, but it also comes with a command line interface for advanced users or for high-volume services. WebShot can produce images in the JPG, GIF, PNG, or BMP formats. It was developed in C by Nathan Moinvaziri.
The program is free for use on Windows XP, though PayPal donations are encouraged. Nominal charges are applied to other Windows versions and use the command line. Linux is not supported and Internet Explorer must be installed.
The graphical UI on Windows XP has a standard tabbed design. Single thumbnails or ones in batch driven from a text file may be used. Output files can be flexibly sized via the above formats. The screen capture itself can be based on mandatory or max and min browser display parameters. There are a variety of file naming parameters and system settings allow WebShot to work in Web-friendly ways. Here’s an example of the Image tab for the GUI:
The command-liine version accepts about 20 different parameters.
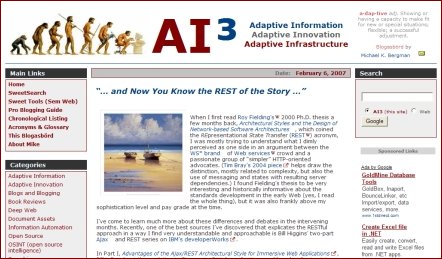
Depending on settings, you can get a large variety of outputs. The long banner image to the left, for example, is a “complete” Web page dump of my Web site at the time of this posting, with about 8 consecutive posts shown (160 x ~2300). The system automatically stitches together the multiple long page screenshots, with the resolution in this case being set by the input width parameter of 160 pixels.
Another option is this sample “cropped” one (440 x 257) where I’m actually cutting the standard screen display to about 50% of its normal vertical (height) dimension:
And, then, the next example shows what I have chosen as my “standard” thumbnail size (160 x 120) (I added the image borders, not the program):

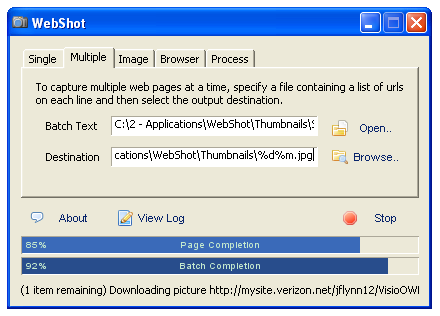
In batch mode, I set the destination parameter such that I got both a logical domain portion in the file name (%d) and a hashed portion (%m) since there were a few occasions of multiple, but different Web pages, from the same host domain.
As noted, download re-tries, delays and timeouts are all settable to be a good Web citizen while getting acceptable results. With more-or-less standard settings, I was able to complete the 400 thumbnail downloads (without error, I should mention) in just a few minutes for the Sweet Tools dataset.
How I Do Bulk Thumbnails for Sweet Tools
Your use will obviously vary, but I kept notes for myself so that I could easily repeat or update this batch process (in fact, I have done so already a couple of times with the incremental updates to Sweet Tools). This general work flow is:
- Create a text file with host Web site URLs in spreadsheet order
- Run WebShot with these general settings:
- destination switches of %d%m (core domain, plus hash)
- image at 160w x 120h (my standard; could be anything as long as proper aspect maintained)
- use of Multiple tab, with a new destination directory for each incremental update
- browser setting at 1024 x 768 required (most common aspect today); min of 800 x 600; highest quality image
- At completion, go to a command window and write-out image file names (images complete in the same order as submitted). (In Windows, this is the
dir/o:d > listing.txtcommand.) Then, copy the file names in the resulting text file back into the spreadsheet for the record < --> image correspondence - Upload to the appropriate WordPress image directory.
Some Other Tips
Like many such tools, there is insufficient documentation for the WebShot package. But, with some experimentation, it is in fact quite easy to accomplish a number of management or display options. Some of the ones I discovered are:
- If harvesting multiple individual Web pages from the same domain, use the domain (%d) and hash (%m) options noted above
- For complete capture of long Web pages (such as the image of my own Web site to the left), first decide on a desired resolution set via ‘width’ on the Image tab, leave height blank, and leave the browser settings open
- For partial screen captures without distortion. set the image dimensions to the desired final size with height the desired partial percentage value, then adjust the browser dimensions to equal the image aspect.
 |
An AI3 Jewels & Doubloon Winner |
