Posted:September 16, 2020

Refining Plans and Directories to Complete the Roundtrip

This installment begins a new major part in our Cooking with Python and KBpedia series. Starting with the format of our extraction files, which can come directly from our prior extraction routines or from other local editing or development efforts, we are now in a position to build a working KBpedia from scratch, and then to test it for consistency and satisfiability. This major part, of all parts in this CWPK series, is the one that most closely reflects our traditional build routines of KBpedia using Clojure.

But this current part is also about more than completing our roundtrip back to KBpedia. For, in bringing new assignments to our knowledge graph, we must also test it to ensure it is encoded properly and that it performs as promised. These additional requirements also mean we will be developing more than a build routine module in this part. The way we are structuring this effort will also add a testing module and a cleaning module (for checking encodings and the like). There are a dozen installments, including this one, in this part to cover this ground.

The addition of more modules, with the plan of still more to come thereafter, also compels us to look at how we are architecting our code and laying out our files. Thus, besides code development, we need to pay attention to organizational matters as well.

Starting a New Major Part

I am pretty pleased with how the cowpoke extraction module turned out, so will be following something of the same pattern to build KBpedia in this part. Since we made the early call to bootstrap our project from the small, core top-level KBpedia Knowledge Ontology (KKO), we gained alot of simplification. That is a good trade-off, since KKO itself is a value-neutral top-level ontology built from the semiotic perspective of C.S. Peirce regarding knowledge representation. Our basic design can also be adopted to any other top-level ontology. If that is your desire, how to bring in a different TLO is up to you to figure out, though I hope that would be pretty easy following the recipes in these CWPK installments.

Fortunately as we make the turn to build routines in this part of the roundtrip, we are walking ground that we have been traveling for nearly a decade. We understand the build process and we understand the testing and acceptance criteria necessary to result in quality, publicly-released knowledge graphs. We try to bring these learnings to our functions in this part.

But as I caution at the bottom of each of these installments, I am learning Python myself through this process. I am by no means a knowledgeable programmer, let alone an expert. I am an interested amateur who has had the good fortune to have worked with some of the best developers imaginable, and I only hope I picked up little bits of some good things here and there about how to approach a coding project. Chances are great you can improve on the code offered. I also, unfortunately, do not have the coding experience to provide commercial-grade code. Errors that should be trapped are likely not, cases that need to be accommodated are likely missed, and generalization and code readability is likely not what it could be. I’ll take that, if the result is to help others walk these paths at a better and brisker pace. Again, I hope you enjoy . . .

Organizing Objectives

I have learned some common-sense lessons through the years about how to approach a software project. One of those lessons, obvious through this series itself, is captured by John Bytheway’s quote, “Inch by inch, life’s a cinch. Yard by yard, life’s hard.” Knowing where you want to go and taking bite-sized chunks to get there almost always leads to some degree of success if you are willing to stick with the journey.

Another lesson is to conform to community practice. In the case of Python (and most modern languages, I assume), applications need to be ‘packaged’ in certain ways such that they can be readily brought into the current computing environment. From the source-code perspective, this means conforming to the ‘package’ standard and the organization of code into importable modules. All of this suggests a code base that is kept separate from any project that uses it, and organized and packaged in a way similar to other applications in that language.

An interesting lesson about knowledge graphs is that they are constantly changing — and need to do so. In this regard, knowledge artifacts are not terribly different than software artifacts. Both need to be updated frequently such that versioning and version control are essential. Versioning tells users the basis for the artifact; version control helps to maintain the versions and track differences between releases. Wherever we decide to store our artifacts, they should be organized and packaged such that different versions may be kept integral. Thus, we organize our project results under version number labels.

Then, in terms of this particular project where roundtripping is central and many outputs are driven from the KBpedia knowledge structure, I also thought it made sense to establish separate tracks between inputs (the ‘build’ side) and outputs (the ‘extraction’ side) and to seek parallelisms between the tracks where it makes sense. This informs much of the modular architecture put forward.

All of this needs to be supplemented with utilities for testing, logging, error trapping and messaging, and statistics. These all occur at the time of build or use, and so belong to this leg of our roundtrip. We will not develop code for all of these aspects in this part of the CWPK series, but we will try to organize in anticipation of these requirements for a complete project. We’ll fill in many of those pieces in major parts to come.

Anticipated Directory Structures

These considerations lead to two different directory structures. The first is where the source code resides, and is in keeping with typical approaches to Python packages. Two modules are in-progress, at least at the design level, to complete our roundtripping per the objectives noted above. Two modules in logging and statistics are likely to get started in this current part. And another three are anticipated for efforts with KBpedia to come before we complete this CWPK series. Here is that updated directory structure, with these new modules noted in red:

|-- PythonProject                                              
|-- Python
|-- [Anaconda3 distribution]
|-- Lib
|-- site-packages
|-- [many]
|-- cowpoke
|-- __init__.py |-- __main__.py |-- analytics.py # anticipated new module |-- build.py # in-progress module |-- clean.py # in-progress module |-- config.py |-- embeddings.py# anticipated new module
|-- extract.py |-- graphics.py # anticipated new module |-- logs.py # likely new module |-- stats.py # likely new module |-- utils.py # likely new module
|-- More
|-- More
Figure 1: cowpoke Source Code (‘Package’) Directory Structure

In contrast, we need a different directory structure to host our KBpedia project, in which inputs to building KBpedia (‘build_ins’) are in one main branch, the results of a build (‘targets) are in another main branch, ‘extractions’ from the current version in a third, and a fourth (‘outputs’) are the results of post-build use of the knowledge graph. Further, these four main branches are themselves listed under their respective version number. This design means individual versions may be readily zipped or shared on GitHub in a versioned repository.

(NB: The ‘sandbox’ directory below we have referenced many times in this CWPK series, and is unique to it. It houses some of the example starting files needed for this series. We will continue to use the ‘sandbox’ as one of our main directory options.)

As of this current stage in our work, here then is how the project-related directory structures currently look for KBpedia:

|-- PythonProject 
|-- kbpedia
|-- sandbox
|-- v250
|-- etc.
|-- v300
|-- build_ins
|-- classes
|-- classes_struct.csv
|-- classes_annot.csv
|-- fixes
|-- TBD
|-- TBD
|-- mappings
|-- etc.
|-- etc.
|-- ontologies
|-- kbpedia-reference-concepts.owl
|-- kko.owl
|-- properties
|-- annotation_properties
|-- data_properties
|-- object_properties
|-- stubs
|-- kbpedia-reference-concepts.owl
|-- kko.owl
|-- typologies
|-- ActionTypes
|-- Agents
|-- etc.
|-- working
|-- TBD
|-- TBD
|-- extractions
|-- classes
|-- classes_struct.csv
|-- classes_annot.csv
|-- mappings
|-- etc.
|-- etc.
|-- properties
|-- annotation_properties
|-- data_properties
|-- object_properties
|-- typologies
|-- ActionTypes
|-- Agents
|-- etc.
|-- outputs
|-- analytics
|-- TBD
|-- TBD
|-- embeddings
|-- TBD
|-- TBD
|-- training_sets
|-- TBD
|-- TBD
|-- targets
|-- logs
|-- TBD
|-- TBD
|-- mappings
|-- etc.
|-- etc.
|-- ontologies
|-- kbpedia-reference-concepts.owl
|-- kko.owl
|-- stats
|-- TBD
|-- TBD
|-- typologies
|-- ActionTypes
|-- Agents
|-- etc.
|-- Python
|-- etc.
|-- etc.
|-- More
Figure 2: KBpedia Project Directory Structure (by version)

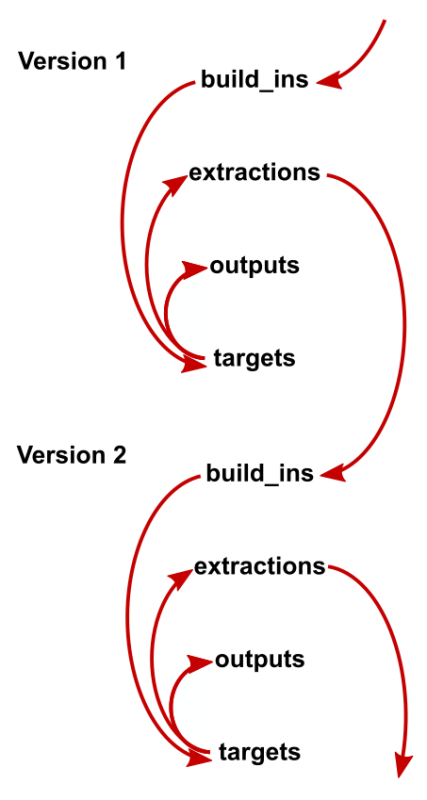
You will notice that nearly all ‘extractions’ categories are in the ‘build’ categories as well, reflecting the roundtrip nature of the design. Some of the output categories remain a bit speculative. This area is likely the one to see further refinement as we proceed.

Some of the directories shown, such as ‘analytics’, ’embeddings’, ‘mappings’, and ‘training_sets’ are placeholders for efforts to come. One directory, ‘working’, is a standard one we have adopted over the years to place all of the background working files (some of an intermediate nature leading to the formal build inputs) in one location. Thus, as we progress version-to-version, we can look to this directory to help remind us of the primary activities and changes that were integral to that particular build. When it comes time for a public release, we may remove some of these working or intermediate directories to what is published at GitHub, but we retain this record locally to help document our prior work.

Overall, then, what we have is a build that begins with extractions from a prior build or starting raw files, with those files being modified within the ‘build_ins’ directory during development. Once the build input files are ready, the build processes are initiated to write the new knowledge graph to the ‘targets’ directory. Once the build has met all logic and build tests, it is then the source for new ‘extractions’ to be used in a subsequent build, or to conduct analysis or staging of results for other ‘outputs’. Figure 3 is an illustration of this workflow:

Workflow by Version and Directory Structure
Figure 3: Workflow by Version and Directory Structure

A new version thus starts by copying the directory structure to a new version branch, and copying over the extractions and stubs from the prior version.

We now have the framework for moving on to the next installment in our CWPK series, wherein we begin the return leg of the roundtrip, what is shown as the ‘build_ins’ → ‘targets’ path in Figure 3.

NOTE: This article is part of the Cooking with Python and KBpedia series. See the CWPK listing for other articles in the series. KBpedia has its own Web site.
NOTE: This CWPK installment is available both as an online interactive file or as a direct download to use locally. Make sure and pick the correct installment number. For the online interactive option, pick the *.ipynb file. It may take a bit of time for the interactive option to load.
I am at best an amateur with Python. There are likely more efficient methods for coding these steps than what I provide. I encourage you to experiment — which is part of the fun of Python — and to notify me should you make improvements.

Posted by AI3's author, Mike Bergman Posted on September 16, 2020 at 10:41 am in CWPK, KBpedia, Semantic Web Tools | Comments (0)
The URI link reference to this post is: https://www.mkbergman.com/2376/cwpk-37-organizing-the-code-base/
The URI to trackback this post is: https://www.mkbergman.com/2376/cwpk-37-organizing-the-code-base/trackback/
Posted:September 15, 2020

vlookup is Your Friend

One major benefit of large-scale extracts from KBpedia (or any knowledge graph, for that matter) is to produce bulk files that may be manipulated offline more effectively than working directly with the ontology or with an ontology IDE like Protégé. We address bulk manipulation techniques and tips in this current installment in the Cooking with Python and KBpedia series. This current installment also wraps up our mini-series on the cowpoke extraction module as well as completes our third major part on extraction and module routines in our CWPK series.

Typically, during the course of a major revision to KBpedia, I tend to spend more time working on offline files than in directly working with an ontology editor. However, now that we have our new extraction routines working to our liking, I can also foresee adding new, flexible steps to my workflow. With the extraction routines, I now have the choice of making changes directly in Protégé OR in bulk files. Prior to this point with our Clojure build codes, all such changes needed to be made offline in the bulk files. Now that we can readily extract changes made directly within an ontology editor, we have gained much desired flexibility. This flexibility also means we may work off of a central representation that HTML Web forms may interact with and modify. We can now put our ontologies directly in the center of production workflows.

These bulk files, which are offline comma-separated value (CSV) extraction files in our standard UTF-8 encoding, are well suited for:

  • Bulk additions
  • Bulk deletions
  • Bulk re-factoring, including modularization
  • Consistent treatment of annotations
  • Staging mapping files
  • Acting as consolidation points for new datasets resulting from external queries or databases, and
  • Duplicates identification or removal.

In the sections below I discuss preliminaries to working with bulk files, use of the important vlookup function in spreadsheets, and miscellaneous tips and guidance for working with bulk files in general. There are hundreds of valuable references on these topics on the Web. I conclude this installment with a few (among many) useful references for discovering more about working with CSV files.

Preliminaries to Working with Bulk Files

In the CWPK #27 installment on roundtripping, I made three relevant points. First, CSV files are a simple and easy flat-text format for flexibly interchanging data. Second, while there are conventions, there are no reliable standards for the specific format used, importantly for quoting text and using delimiters other than commas (which, if used, in longer text also needs to be properly ignored, or “escaped”). And, third, lacking standards, CSV files used for an internal project should adhere to their own standards, beginning with the UTF-8 encoding useful to international languages. You must always be mindful of these internal standards of comma delimitation, quoted long strings, and use of UTF-8.

The reason CSV is the most common data exchange format is likely due to the prevalence of Microsoft Excel, since CSV is the simplest flat-file option offered. Unfortunately, Excel does not do a good job of making CSV usable in standard ways and often imposes its own settings that can creep up in the background and corrupt files, especially due to encoding switches. One can obviously work with Excel to do these things since thousands do so and have made CSV as popular as it is. But for me, personally, working constantly with CSV files, I wanted a better approach.

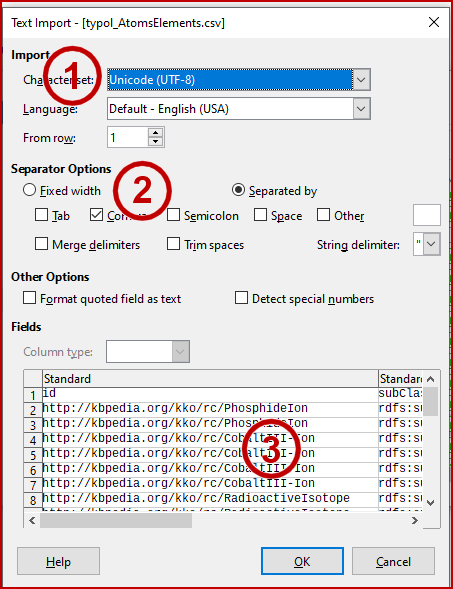
I have found the open-source LibreOffice (what originally began as OpenOffice, which has subsequently been acquired by Oracle) to be a superior alternative for CSV purposes, sufficient for me to completely abandon MS Office. The next screen captures opening a file in LibreOffice and the three considerations that make doing so safe for CSV:

Opening a CSV File with LibreOffice
Figure 1: Opening a CSV File with LibreOffice

The first thing to look for is that the encoding is UTF-8 (1). There are actually multiple UTF options, so make sure and pick ‘-8’ v ‘-16’ or ‘-32’ options. Second, do not use fixed length for the input, but use delimiters (“separators”) using the comma and double-quoted strings (2). And third, especially when you are working with a new file, scan (3) the first records (up to 1000 may be displayed) in the open screen window so see if there are any encoding problems. If so, do not open the file, and see if you can look at the file in a straight text editor. You can follow these same steps in Excel, it is just out-of-the way to do so. LibreOffice always presents this screen for review when opening a CSV file.

I have emphasized these precautions because it is really, really painful to correct a corrupted file, especially ones that can grow to thousands of rows long. Thus, the other precaution I recommend is to frequently back up your files, and to give them date stamps in their file names (I append -YYYMMDD to the end of the file name because it always sorts in date order).

These admonishments really amount to best practices. These are good checks to follow and will save you potential heartache down the road. Take it from a voice of experience.

vlookup in Detail

Once in CSV form, our bulk files can be ingested into a spreadsheet, with all of the powers that brings of string manipulations, formatting, conditional changes, and block moves and activities. It is not really my intent to provide a tutorial on the use of spreadsheets for flat data files. There are numerous sources online that provide such assistance, and most of us have been working with spreadsheets in our daily work activities. I do want to highlight the most useful function available to work with bulk data files, vlookup, in this section, and then to offer a couple of lesser-known tips in the next. I also add some Additional Documentation in the concluding section.

vlookup is a method for mapping items (by matching and copying) in one block of items to the equivalent items in a different block. (Note: the practice of naming blocks of cells in a spreadsheet is a very good one for many other spreadsheet activities, which I’ll touch upon in the next section.) The vlookup mapping routine is one of the most important available to you since it is the method for integrating together two sets (blocks) of related information.

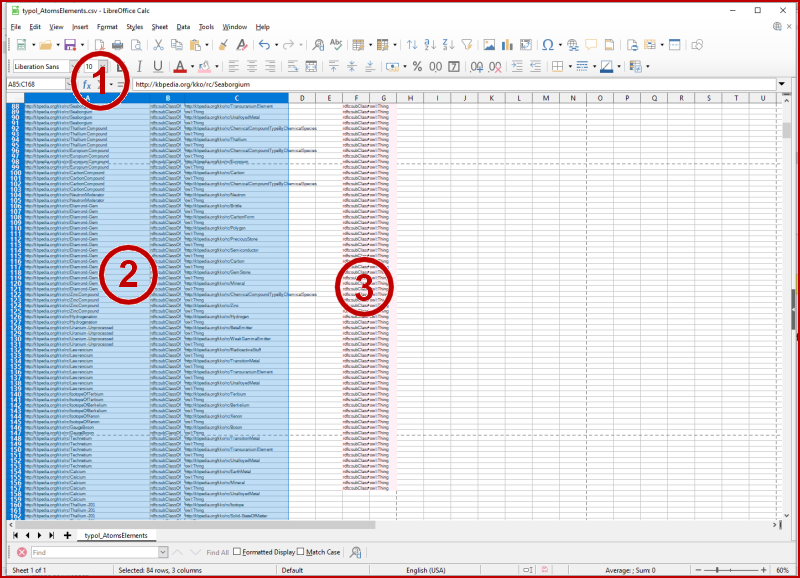
While one can map items between sheets using vlookup, I do not recommend it, since I find it more useful to see and compare the mapping results on one sheet. We illustrate this use of two blocks on a sheet with this Figure 2:

Named Blocks Support vlookup
Figure 2: Named Blocks Support vlookup

When one has a source block of information to which we want to map information, we first highlight our standard block of vetted information (2) by giving it a name, say ‘standard’, in the block range cell (1) to the immediate upper left from the spreadsheet. Besides normally showing the coordinates of the row and cell references in the highlighted block, we can also enter a name such as ‘standard’ into this cell. This ‘standard’, once typed in later in this same box (1) or picked from a named list of blocks, will cause our ‘standard’ block to be highlighted again. Then, we have potential information (3) that we want to ‘map’ to items in that ‘standard’ name block. As used here, by convention, ‘items’ MUST appear in the first column of the ‘map’ block (3), and only match other items found in any given column of the ‘standard’ (2) block. In the case of KBpedia and its files, the ‘standard’ block (2) is typically the information in one of our extraction files, to which we may want to ‘map’ another extraction file (3) or a source of external information (3).

(NB: A similar function called hlookup applies to rows v columns, but I never use it because our source info is all individuated by rows.)

(NB2: Of course, we can also map in the reverse order from ‘standard’ to ‘map’. Reciprocal mapping, for instance, is one way to determine whether both sets overlap in coverage or not.)

So, only two things need to be known to operate vlookup: 1) both source (‘standard’) and target (‘map’) need to be in named blocks; and 2) the items matched in the ‘standard’ block need to be in the first column of the ‘map’ block. Once those conditions are met, any column entry from the ‘map’ block may be copied to the cell where the vlookup function was called. Once you have the formula working as you wish, you then can copy that vlookup cell reference down all of the rows of the ‘standard’ block, thereby checking the mapping for the entire source ‘standard’ block.

When I set these up, I put the initial vlookup formula into an empty top cell to either the left or right of the ‘standard’ block, depending on whether the possibly matching item is on the left or right of the block. (It’s easier to see the results of the lookup that way.) Each vlookup only looks at one column in the ‘standard’ for items to match against the first column in the ‘map’, and then returns the value of one of the columns in the ‘map’.

The ‘map’ block may only be a single column, in which case we are merely checking for intersections (and therefore, differences) between the blocks. Thus, one quick way to check if two files returned the same set of results is to copy the identifiers in one source as a ‘map’ block to a ‘standard’ source. If, after testing the formula and then copying vlookup down all rows of the adjacent ‘standard’, and then we see values returned for all cells, we know that all of the items in the ‘standard’ block (2) are included in the items of the ‘map’ block (3).

Alternatively, the ‘map’ block may contain multiple columns, in which case what is in the column designated (1 to N) is the value of what gets matched and copied over. This approach provides a method, column by column, to add additional items to a given row record.

Here is the way the formula looks when entered into a cell:

  =VLOOKUP(A1,map,2,0)

In this example, A1 is the item to be looked up in the ‘standard’ block. If we copy this formula down all rows of the ‘standard’ block, all items tested for matches will be in column A. The map reference in the formula refers to the ‘map’ named block. The 2 (in reference to the 1 to N above) tells the formula to return the information in column 2 of ‘map’ if a match occurs in column 1 (which is always a condition of vlookup). The 0 is a flag in the formula indicating only an exact match will return a value. If no match occurs, the formula indicates #N/A, otherwise the value is the content of the column cell (2 in this case) matched from ‘map’.

If, after doing a complete vlookup I find the results not satisfactory, I can undo. If I find the results satisfactory, I highlight the entire vlookup column, copy it, and then paste it back into the same place with text and results only. This converts the formulas to actual transferred values and then I can proceed to next steps, such as moving the column into the block, adding some prefixes, fixing some string differences, etc. After incorporation of the accepted results, it is important to make sure our ‘standard’ block reflects the additional column information.

Particularly when dealing with annotations, where some columns may contain quite long strings, I do two things, occasioned by the fact that opening a CSV file causes column widths to adjust to the longest entry. First, I do not allow any of the cells to word wrap. This prevents rows becoming variable heights, which I find difficult to use. Second, I highlight the entire spreadsheet (via the upper left open header cell), and then set all columns to the same width. This solves the pain of scrolling left or right where some columns are too wide.

It takes a few iterations to get the hang of the vlookup function, but, once you do, you will be using it for many of the bulk activities listed in the intro. vlookup is a powerful way to check unions (do single-column lookups both ways), intersections, differences, duplicates, and the transfer of new values to incorporate into records.

Like other bulk activities, also be attentive to backups and saving of results as you proceed through multi-step manipulations.

Other General Spreadsheet Tips

Here are some other general tips for using spreadsheets, organized by topic.

Sorts

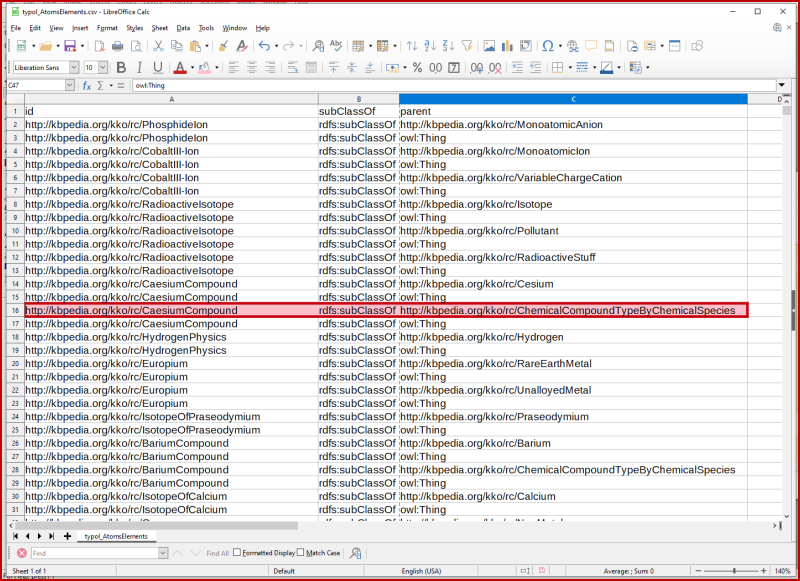
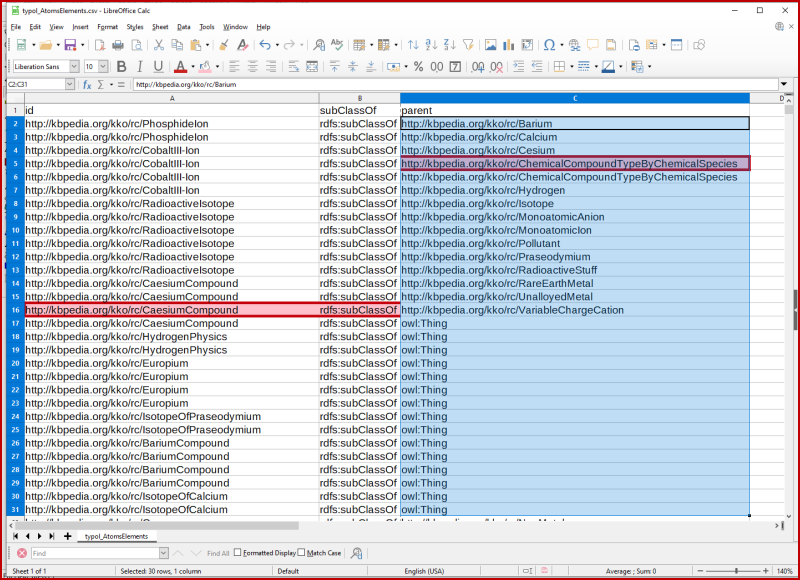
Named blocks are a good best practice, especially for sorts, which are a frequent activity during bulk manipulations. However, sorts done wrong have the potential to totally screw up your information. Remember, our extracts from KBpedia are, at minimum, a semantic triple, and in the case of annotation extractions, multiple values per subject. This extracted information is written out as records, one after another, row by row. The correspondence of items to one another, in its most basic form the s-p-o, is a basic statement or assertion. If we do not keep these parts of subject – verb – object together, our statements become gibberish. Let’s illustrate this by highlighting one record — one statement — in an example KBpedia extraction table:

Rows are Sacrosanct
Figure 3: Rows are Sacrosanct

However, if we are to sort this information by the object field in column C, we can see we have now broken our record, in the process making gibberish out of all of our statements:

Sorting without a Named Block
Figure 4: Sorting without a Named Block

We prevent the breakage in Figure 4 from occurring by making sure we never sort on single columns, but on entire blocks. We could still sort on column C but without breakage by first invoking our named ‘standard’ block (or whatever name to ‘standard’ we have chosen) before we enter our search parameters (see S & R further below).

Here’s another tip for ‘standard’ or master blocks: Add a column with a row sequence number for each row. This will enable you to re-sort on this column and restore the block’s original order (despite how other columns of the block may alphabetize). To create this index, put ‘1’ in the top cell, ‘1+C1’ in the cell below (assuming our index in in Col C), and copy it down all rows. Then copy the column, and paste it back in place with text + values only.

Duplicates

A quick way to find duplicates in a block is to have all of its subjects or identifiers in Col A, and sort the block. Then, in the column immediately to the left of the block, enter the =EXACT(B1,B2) formula in the cell (the two cells are to the immediate right and then one above that for the two arguments). If the content in B1 and B2 are exactly the same, the formula will evaluate to TRUE, if not FALSE. Copy that formula down all rows adjacent to the block.

Every row marked with TRUE is a duplicate with respect to Col B. If you want to remove these duplicates, copy the entire formula column, paste it back as text and values only, and then sort that column and your source block. You can then delete en masse all rows with duplicates (TRUE).

You can test for duplicate matter across columns with the same technique. Using the =CONCATENATE() operator, you may temporarily combine values from multiple columns. Create this synthetic concatenation in its own column, copy it down all block rows, and then test for duplicates with the =EXACT() operator as above.

Search and Replace

The search function in spreadsheets goes well beyond normal text and includes attributes (like bolding), structural characters like tabs or line feeds, or regular expressions (regex). Regex is a particularly powerful capability that few know, but unlocks tremendous power. However, an exploration of regex is beyond the scope of this CWPK series. I have found simple stuff like recognizing capitalization or conditional replacements to be very helpful, but basic understanding let alone mastery of regex requires a substantial learning commitment.

I use the search box below the actual spreadsheet for repeat search items. So, while I will use the search dialog for complicated purposes, I put the repeated search queries here. To screen against false matches, I also use the capitalization switch and also try to find larger substrings that embed the fragment I am seeking but removes adjacent text that fails my query needs.

Another useful technique is to only search within a selection, which is selected by a radiobutton on the search dialog. Highlighting a single column, for example, or some other selection boundary like a block, enables local replacements without affecting other areas of the sheet.

String Manipulations

One intimidating factor of spreadsheets is the number of functions they have. However, hidden in this library are many string manipulation capabilities, generally all found under the ‘Text’ category of functions. I have already mentioned =CONCATENATE() and =EXACT(). Other string functions I have found useful are =TRIM() (removes extra spaces), =CLEAN() (removes unprintable characters), =FIND() (find substrings, useful for flagging entries with shared characteristics), and =RIGHT() (testing the last character is a string). These kinds of functions can be helpful in cleaning up entries as well as finding stuff within large, bulk files.

There are quite a few string functions for changing case and converting formats, I tend to use these less than the many main menu options found under Format → Text.

These functions can often be combined in surprising ways. Here are two examples of string manipulations that are quite useful (may need to adjust cell references):

For switching person first and last names (where the target is in A17):

  =MID(A17,FIND(" ",A17)+1,1024)&", "&LEFT(A17,FIND(" ",A17)-1)

For singularizing most plurals (-ies to -y not covered, for example):

  =IF(OR(RIGHT(A1,1)="s",RIGHT(A1,2)="es"),IF(RIGHT(A1,2)="es",LEFT(A1,(LEN(A1)-2)),LEFT(A1,(LEN(A1)-1))),A1)

This does not capture all plural variants, but others may be added given the pattern.

Often a bit of online searching will turn up other gems, depending on what your immediate string manipulation needs may be.

Other

One very useful capability, but close to buried in LibreOffice, is the Data → Text to Columns option. It is useful to splitting a column into two or more cells based on a given character or attribute, useful to long strings or other jumbled content. Invoke the dialog on your own spreadsheet to see the dialog for this option. There are many settings for how to recognize the splitting character, each occurrence of which causes a new cell to be populated to the right. Thus, it is best to have the target column with the long strings at the far right of your block (since when it makes splits, it populates cells to the right, but only if the splitting condition is met. Thus, if existing columns of information exist to the right, they will become jagged and out of sync.

Data Representations in Python

We are already importing the csv module into cowpoke. However, there is a supplement to that standard that provides a bit more functionality called CleverCSV. I have not tested it. There is also a utility to combine CSV files with glob, which relates more to pandas and is also a utility I have not used.

Please note there are additional data representation tips involving Python in CWPK #21.

Tips for Some Other Tools

As we alluded to in CWPK #25, Wikipedia, DBpedia, and Wikidata are already mapped to KBpedia and provide rich repositories of instance data retrievable via SPARQL. (A later installment will address this topic.) The results sets from these queries may be downloaded as flat files that can be manipulated with all of these CSV techniques. Indeed, retrievals from these sources have been a key source for populating much of the annotation information already in KBpedia.

You can follow this same method to begin creating your own typologies or add instances or expand the breadth or depth of a given topic area. The basic process is to direct a SPARQL query to the source, download the results, and then manipulate the CSV file for incorporation into one of your knowledge graph’s extraction files for the next build iteration.

Sample Wikidata queries, numbering into the hundreds, are great studying points for SPARQL and sometimes templates for your own queries. I also indicated in CWPK #25 how the SPARQL VALUE statement may be used to list identifiers for bulk retrievals from these sources.

You can also use the Wikipedia and Wikidata Tools plug-in for Google spreadsheets to help populate tables that can be exported as CSV for incorporation. You should also check out OpenRefine for data wrangling tasks. OpenRefine is very popular with some practitioners, and I have used it on occasion when some of the other tools listed could not automate my task.

Though listed last, text editors are often the best tool for changes to bulk files. In these cases, we are now editing the flat file directly, and not through a column and row presentation in the spreadsheet. As long as we are cognizant and do not overwrite comma delimiters and quoted long strings, the separate text and control attributes such as tabs or carriage returns can be manipulated with the different functions these applications bring.

A Conclusion to this Part

The completion of this installment means we have made the turn on our roundtrip quest. We have completed our first extraction module and have explained a bit how we can modify and manipulate the bulk files that result from our extraction routines.

In our next major part of the CWPK series we will use what we have learned to lay out a more complete organization of the project, as well as to complete our roundtripping with the addition of build routines.

Additional Documentation

As noted, there are multiple sources from multiple venues to discuss how to use spreadsheets effectively, many with specific reference to CSV files. We also have many online sources that provide guidance on getting data from external endpoints using SPARQL, the mapping of results from which is one of the major reasons for making bulk modifications to our extraction files. Here are a few additional sources directly relevant to these topics:

NOTE: This article is part of the Cooking with Python and KBpedia series. See the CWPK listing for other articles in the series. KBpedia has its own Web site.
NOTE: This CWPK installment is available both as an online interactive file or as a direct download to use locally. Make sure and pick the correct installment number. For the online interactive option, pick the *.ipynb file. It may take a bit of time for the interactive option to load.
I am at best an amateur with Python. There are likely more efficient methods for coding these steps than what I provide. I encourage you to experiment — which is part of the fun of Python — and to notify me should you make improvements.
Posted by AI3's author, Mike Bergman Posted on September 15, 2020 at 10:02 am in CWPK, KBpedia, Semantic Web Tools | Comments (0)
The URI link reference to this post is: https://www.mkbergman.com/2374/cwpk-36-bulk-modification-techniques/
The URI to trackback this post is: https://www.mkbergman.com/2374/cwpk-36-bulk-modification-techniques/trackback/
Posted:September 14, 2020

Completing the Extraction Methods and Formal Packaging

This last installment in our mini-series of packaging our Cooking with Python and KBpedia project will add one more flexible extraction routine, and complete packaging the cowpoke extraction module. This completion will set the template for how we will add additional clusters of functionality as we progress through the CWPK series.

The new extraction routine is geared more to later analysis and use of KBpedia than our current extraction routines. The routines we have developed so far are intended for nearly complete bulk extractions of KBpedia. We would like to add more fine-grained ways to extract various ‘slices’ from KBpedia, especially those that may arise from individual typology changes or SPARQL queries. We could benefit from having an intermediate specification for extractions that could be used for directing results from other functions or analyses.

Steps to Package a Project so Far

To summarize, here are the major steps we have discovered so far to transition from prototype code in the notebook to a Python package:

  1. Generalize the prototype routines in the notebook
  2. Find the appropriate .. Lib/site-packages directory and define a new directory with your package name, short lowercase best
  3. Create an __init__.py file in that same directory (and any subsequent sub-package directories should you define the project deeper); add basic statements similar to above
  4. Create a __main__.py file for your shared functions; it is a toss-up whether shared variables should also go here or in __init__.py
  5. If you want a single point of editing for changing inputs for a given run via a ‘record’ metaphor, follow something akin to what I began with the config.py
  6. Create a my_new_functions.py module where the bulk of your new work resides (extraction in our current instance). The approach I found helpful was to NOT wrap my prototype functions in a function definition at first. Only in the next step, once the interpreter is able to step through the new functions without errors, do I then wrap the routines in definitions
  7. In an interactive environment (such as Jupyter Notebook), start with a clean kernel and try to import myproject (where ‘myproject’ is the current bundle of functionality you are working on). Remember, an import will run the scripts as encountered, and if you have points of failure due to undefined variables or whatever, the traceback on the interpreter will tell you what the problem is and offer some brief diagnostics. Repeat until the new function code processes without error, then wrap in a definition, and move on to the next code block
  8. As defined functions are built, try to look for generalities of function and specification and desired inputs and outputs. These provide the grist for continued re-factoring of your code
  9. Document your code, which is only just beginning for this KBpedia project. I’ve been documenting much in the notebook pages, but not yet enough in the code itself.

Objectives for This Installment

Here is what I want to accomplish and wrap up in this installment focusing on custom extractions. I want to:

  • Arbitrarily select one to many classes or properties for driving an extraction
  • Define one or multiple starting points for descendants() or one or multiple individual starting points. This entry point is provided by the variable root in our existing extraction routines
  • Allow the extract_deck specification to also define the rendering method (see next)
  • For iterations, specify input and output file forms, so need: iterator, base + extension logic, relate to existing annotations, etc., as necessary
  • This suggests to reuse and build from the existing extraction routines, and
  • Improve the file-based and -named orientation of the routines.

The Render Function

You may recall from the tip in CWPK #29 that owlready2 comes with three rendering methods for its results: 1) a default method that has a short namespace prefix appended to all classes and properties; 2) a label method where no prefixes are provided; and 3) a full iri method where all three components of the subject-predicate-object (s-p-o) semantic triple are given their complete IRI. If you recall, here are those three function calls:

set_render_func(default_render_func)

set_render_func(render_using_label)

set_render_func(render_using_iri)

To provide these choices, we will add a render method specification in the extract_deck and provide the switch at the top of our extraction routines. We will use the same italicized names to specify which of the three rendering options has been chosen.

A Custom Extractor

The basic realization is that with just a few additions we are able to allow customization of our existing extraction routines. Initially, I thought I would need to write entirely new routines. But, fortunately, apparently our existing routines already are sufficiently general to enable this customization.

Since it is a bit simpler, we will use the struct_extractor function to show where the customization enhancements need to go. We will also provide the code snippet where the insertion is noted. I provide comments on these additions below the code listing.

Note these same changes are applied to the annot_extractor function as well (not shown). You can inspect the updated extraction module at the conclusion of this installment.

OK, so let’s explain these customizations:

def struct_extractor(**extract_deck):
    print('Beginning structure extraction . . .')
# 1 - render method goes here    
    r_default = ''
    r_label = ''
    r_iri = ''
    render = extract_deck.get('render')
    if render == 'r_default':
        set_render_func(default_render_func)
    elif render == 'r_label':
        set_render_func(render_using_label)
    elif render == 'r_iri':
        set_render_func(render_using_iri)
    else:
        print('You have assigned an incorrect render method--execution stopping.')
        return
# 2 - note about custom extractions
    loop_list = extract_deck.get('loop_list')
    loop = extract_deck.get('loop')
    out_file = extract_deck.get('out_file')
    class_loop = extract_deck.get('class_loop')
    property_loop = extract_deck.get('property_loop')
    descent_type = extract_deck.get('descent_type')
    descent = extract_deck.get('descent') 
    single = extract_deck.get('single') 
    x = 1
    cur_list = []
    a_set = []
    s_set = []
    new_class = 'owl:Thing'
# 5 - what gets passed to 'output'
    with open(out_file, mode='w', encoding='utf8', newline='') as output:
        csv_out = csv.writer(output)
        if loop == 'class_loop':                                             
            header = ['id', 'subClassOf', 'parent']
            p_item = 'rdfs:subClassOf'
        else:
            header = ['id', 'subPropertyOf', 'parent']
            p_item = 'rdfs:subPropertyOf'
        csv_out.writerow(header)       
# 3 - what gets passed to 'loop_list' 
        for value in loop_list:
            print('   . . . processing', value)                                           
            root = eval(value)
# 4 - descendant or single here
            if descent_type == 'descent':
                a_set = root.descendants()
                a_set = set(a_set)
                s_set = a_set.union(s_set)
            elif descent_type == 'single':
                a_set = root
                s_set.append(a_set)
            else:
                print('You have assigned an incorrect descent method--execution stopping.')
                return                         
        print('   . . . processing consolidated set.')
        for s_item in s_set:
            o_set = s_item.is_a
            for o_item in o_set:
                row_out = (s_item,p_item,o_item)
                csv_out.writerow(row_out)
                if loop == 'class_loop':
                    if s_item not in cur_list:                
                        row_out = (s_item,p_item,new_class)
                        csv_out.writerow(row_out)
                cur_list.append(s_item)
                x = x + 1
    print('Total unique IDs written to file:', x) 

The notes that follow pertain to the code listing above.

The render method (#1) is just a simple switch set in the configuration file. Only three keyword options are allowed; if a wrong keyword is entered, the error is flagged and the routine ends. We also added a ‘render’ assignment at the top of the code block.

What now makes this routine (#2) a custom one is the use of the configurable custom_dict and its configuration settings. The custom_dict dictionary is specified by assigning to the loop_list (#3). The custom_dict dictionary can take one or many key:value pairs. The first item, the key, should take the name that you wish to use as the internal variable name. The second item, the value, should correspond to the property or class with its namespace prefix. Here are the general rules and options available for a custom extraction:

  • You may enter properties OR classes into the custom_dict dictionary, but not both, in your pre-run configurations
  • The ‘iri‘ switch for the renderer is best suited for the struct_extractor function. It should probably not be used for annotations given the large number of output columns and loss of subsequent readability when using the full IRI. The choice of actual prefix is likely not that important since it is easy to do global search-and-replaces when in bulk mode
  • You may retrieve items in the custom_dict dictionary either singly or all of its descendants, depending on the use of the ‘single’ and ‘descent’ keyword options (see #4 next).

Item #4 is another switch to either run the entries in the custom_dict dictionary as single ‘roots’ (thus no sub-classes or sub-properties) or with all descendants. The descent_type has been added to the extract_deck settings, plus we added the related assignments to the beginning of this code block.

The last generalized capability we wanted to capture was the ability to print out all of the structural aspects of KBpedia’s typologies, which suggested some code changes at roughly #5 above. While I am sure I could have figured out a way to do this, because of interactions with the other customizations this addition proved to be more complicated than warranted. So, rather than spend undue time trying to cram everything into a single, generic function (struct_extractor), I decided the easier and quicker choice was to create its own function, picking up on many of the processing constructs developed for the other extractor routines.

Basically, what we want in a typology extract is:

  • Separate extractions of individual typologies to their own named files
  • Removal of the need to find unique resources across multiple typologies. Rather, the intent is to capture the full scope of structural (subClassOf aspects in each typology
  • A design that enables us to load a typology as an individual ontology or knowledge graph into a tool such as Protégé.

By focusing on a special extractor limited to classes, typologies, structure, and single output files per typology, we were able to make the function rather quickly and simply. Here is the result, the typol_extractor:

def typol_extractor(**extract_deck):
    print('Beginning structure extraction . . .')
    r_default = ''
    r_label = ''
    r_iri = ''
    render = extract_deck.get('render')
    if render == 'r_default':
        set_render_func(default_render_func)
    elif render == 'r_label':
        set_render_func(render_using_label)
    elif render == 'r_iri':
        set_render_func(render_using_iri)
    else:
        print('You have assigned an incorrect render method--execution stopping.')
        return
    loop_list = extract_deck.get('loop_list')
    loop = extract_deck.get('loop')
    class_loop = extract_deck.get('class_loop')
    base = extract_deck.get('base')
    ext = extract_deck.get('ext')
    new_class = 'owl:Thing'
    if loop is not 'class_loop':
        print("Needs to be a 'class_loop'; returning program.")
        return
    header = ['id', 'subClassOf', 'parent']
    p_item = 'rdfs:subClassOf'
    for value in loop_list:
        print('   . . . processing', value)
        x = 1
        s_set = []
        cur_list = []
        root = eval(value)
        s_set = root.descendants()
        frag = value.replace('kko.','')
        out_file = (base + frag + ext)
        with open(out_file, mode='w', encoding='utf8', newline='') as output:                                           
            csv_out = csv.writer(output)
            csv_out.writerow(header)       
            for s_item in s_set:
                o_set = s_item.is_a
                for o_item in o_set:
                    row_out = (s_item,p_item,o_item)
                    csv_out.writerow(row_out)
                    if s_item not in cur_list:                
                        row_out = (s_item,p_item,new_class)
                        csv_out.writerow(row_out)
                cur_list.append(s_item)
                x = x + 1
        output.close()         
        print('Total unique IDs written to file:', x)

Two absolute essentials for this routine are to set the 'loop' key to 'class_loop' and to set the 'loop_list' key to typol_dict.values().

Note the code in the middle of the routine that creates the file name after replacing (removing) the ‘kko.’ prefix from the value name in the dictionary. We also needed to add two further entries to the extract_deck dictionary.

With the caveat that your local file structure is likely different than what we set up for this project, should it be similar the following commands can be used to run these routines. Should you test different possibilities, make sure your input specifications in the extract_deck are modified appropriately. Remember, to always work from copies so that you may restore critical files in the case of an inadvertent overwrite.

Here are the commands:

from cowpoke.__main__ import *
from cowpoke.config import *
import cowpoke
import owlready2

cowpoke.typol_extractor(**cowpoke.extract_deck)

The extract.py File

Again, assuming you have set up your files and directories similar to what we have suggested, you can inspect the resulting extractor code in this new module (modify the path as necessary):

with open(r'C:\1-PythonProjects\Python\Lib\site-packages\cowpoke\extract.py', 'r') as f:
    print(f.read())

Summary of the Module

OK, so we are now done with the development and packaging of the extractor module for cowpoke. Our efforts resulted in the addition of four files under the ‘cowpoke’ directory. These files are:

  • The __init__.py file that indicates the cowpoke package
  • The __main__.py file where shared start-up functions reside
  • The config.py file where we store our dictionaries and where we specify new run settings in the special extract_deck dictionary, and
  • The extract.py module where all of our extraction routines are housed.

This module is supported by three dictionaries (and the fourth special one for the run configurations):

  • The typol_dict dictionary of typologies
  • The prop_dict dictionary of top-level property roots
  • The custom_dict dictionary for tailored starting point extractions, and
  • The extract_deck special dictionary for extraction run settings.

In turn, most of these dictionaries can also be matched with three different extractor routines or functions:

  • The annot_extractor function for extracting annotations
  • The struct_extractor function for extracting the is-a relations in KBpedia, and
  • The typol_extractor dedicated function for extracting out the individual typologies into individual files.

In our next CWPK installment we will discuss how we might manipulate this extracted information in a bulk manner using spreadsheets and other tools. These same extracted files, perhaps after bulk manipulations or other edits and changes, will then form the basis for the input files that we will use to build new versions of KBpedia (or your own extensions and changes to it) from scratch. We are now half-way around our roundtrip.

NOTE: This article is part of the Cooking with Python and KBpedia series. See the CWPK listing for other articles in the series. KBpedia has its own Web site.
NOTE: This CWPK installment is available both as an online interactive file or as a direct download to use locally. Make sure and pick the correct installment number. For the online interactive option, pick the *.ipynb file. It may take a bit of time for the interactive option to load.
I am at best an amateur with Python. There are likely more efficient methods for coding these steps than what I provide. I encourage you to experiment — which is part of the fun of Python — and to notify me should you make improvements.

Posted by AI3's author, Mike Bergman Posted on September 14, 2020 at 10:11 am in CWPK, KBpedia, Semantic Web Tools | Comments (2)
The URI link reference to this post is: https://www.mkbergman.com/2372/cwpk-35-a-python-module-part-iii-custom-extractions-and-finish-packaging/
The URI to trackback this post is: https://www.mkbergman.com/2372/cwpk-35-a-python-module-part-iii-custom-extractions-and-finish-packaging/trackback/
Posted:September 11, 2020

Moving from Notebook to Package Proved Perplexing

This installment of the Cooking with Python and KBpedia series is the second of a three-part mini-series on writing and packaging a formal Python project. The previous installment described a DRY (don’t repeat yourself) approach to how to generalize our annotation extraction routine. This installment describes how to transition that code from Jupyter Notebook interactive code to a formally organized Python package. We also extend our generalized approach to the structure extractor.

In this installment I am working with the notebook and the Spyder IDE in tandem. The notebook is the source of the initial prototype code. It is also the testbed for seeing if the package may be imported and is working properly. We use Spyder for all of the final code development, including moving into functions and classes and organizing by files. We also start to learn some of its IDE features, such as auto-complete, which is a nice way to test questions about namespaces and local and global variables.

As noted in earlier installments, a Python ‘module’ is a single script file (in the form of my_file.py) that itself may contain multiple functions, variable declarations, class (object) definitions, and the like, kept in this single file because of their related functionality. A ‘package’ in Python is a directory with at least one module and (generally) a standard __init__.py file that informs Python a package is available and its name. Python packages and modules are named with lower case. A package name is best when short and without underscores. A module may use underscores to better convey its purpose, such as do_something.py.

For our project based on Cooking with Python and KBpedia (CWPK), we will pick up on this acronym and name our project ‘cowpoke‘. The functional module we are starting the project with is extract.py, the module for the extraction routines we have been developing over the past few installments..

Perplexing Questions

While it is true the Python organization has some thorough tutorials, referenced in the concluding Additional Documentation, I found it surprisingly difficult to figure out how to move my Jupyter Notebook prototypes to a packaged Python program. I could see that logical modules (single Python scripts, *.py) made sense, and that there were going to be shared functions across those modules. I could also see that I wanted to use a standard set of variable descriptions in order to specify ‘record-like’ inputs to the routines. My hope was to segregate all of the input information required for a new major exercise of cowpoke into the editing of a single file. That would make configuring a new run a simple process.

I read and tried many tutorials trying to figure out an architecture and design for this packaging. I found the tutorials helpful at a broad, structural level of what goes into a package and how to refer and import other parts, but the nuances of where and how to use classes and functions and how to best share some variables and specifications across modules remained opaque to me. Here are some of the questions and answers I needed to discover before I could make progress:

1. Where do I put the files to be seen by the notebook and the project?

After installing Python and setting up the environment noted in installments CWPK #9#11 you should have many packages already on your system, including for Spyder and Jupyter Notebook. There are at least two listings of full packages in different locations. To re-discover what your Python paths are, Run this cell:

import sys
print(sys.path)

You want to find the site packages directory under your Python library (mine is C:\1-PythonProjects\Python\lib\site-packages). We will define the ‘cowpoke‘ directory under this parent and also point our Spyder project to it. (NB: Of course, you can locate your package directory anywhere you want, but you would need to add that location to your path as well, and later configuration steps may also require customization.)

2. What is the role of class and defined variables?

I know the major functions I have been prototyping, such as the annotation extractor from the last CWPK #33 installment, need to be formalized as a defined function (the def function_name statement). Going into this packaging, however, it is not clear to me whether I should package multiple function definitions under one class (some tutorials seem to so suggest) or where and how I need to declare variables such as loop that are part of a run configuration.

One advantage of putting both variables and functions under a single class is that they can be handled as a unit. On the other hand, having a separate class of only input variables seems to be the best arrangement for a record orientation (see next question #4). In practice, I chose to embrace both types.

3. What is the role of self and where to introduce or use?

The question of the role of self perplexed me for some time. On the one hand, self is not a reserved keyword in Python, but it is used frequently by convention. Class variables come in two flavors. One flavor is when the variable value is universal to all instances of class. Every instance of this class will share the same value for this variable. It is declared simply after first defining the class and outside of any methods:

variable = my_variable

In contrast, instance variables, which is where self is used, are variables with values specific to each instance of class. The values of one instance typically vary from the values of another instance. Class instance variables should be declared within a method, often with this kind of form, as this example from the Additional Documentation shows:

class SomeClass:
variable_1 = “ This is a class variable”
variable_2 = 100 #this is also a class variable.

def __init__(self, param1, param2):
self.instance_var1 = param1
#instance_var1 is a instance variable
self.instance_var2 = param2
#instance_var2 is a instance variable

In this recipe, we are assigning self by convention to the first parameter of the function (method). We can then access the values of the instance variable as declared in the definition via the self convention, also without the need to pass additional arguments or parameters, making for simpler use and declarations. (NB: You may name this first parameter something other than self, but that is likely confusing since it goes against the convention.)

Importantly, know we may use this same approach to assign self as the first parameter for instance methods, in addition to instance variables. For either instance variables or methods, Python explicitly passes the current instance and its arguments (self) as the first argument to the instance call.

At any rate, for our interest of being able to pass variable assignments from a separate config.py file to a local extraction routine, the approach using the universal class variable is the right form. But, is it the best form?

4. What is the best practice for initializing a record?

If one stands back and thinks about what we are trying to do with our annotation extraction routine (as with other build or extraction steps), we see that we are trying to set a number of key parameters for what data we use and what branches we take during the routine. These parameters are, in effect, keywords used in the routines, the specific values of which (sources of data, what to loop over, etc.) vary by the specific instance of the extraction or build run we are currently invoking. This set-up sounds very much like a kind of ‘record’ format where we have certain method fields (such as output file or source of the looping data) that vary by run. This is equivalent to a key:value pair. In other words, we can treat our configuration specification as the input to a given run of the annotation extractor as a dictionary (dict) as we discussed in the last installment. The dict form looks to be the best form for our objective. We’ll see this use below.

5. What are the special privileges about __main__.py?

Another thing I saw while reading the background tutorials was reference to a more-or-less standard __main.__.py file. However, in looking at many of the packages installed in my current Python installation I saw that this construct is by no means universally used, though some packages do. Should I be using this format or not?

For two reasons my general desire is to remove this file. The first reason is because this file can be confused with the __main__ module. The second reason is because I could find no real clear guidance about best practices for the file except to keep it simple. That seemed to me thin gruel for keeping something I did not fully understand and found confusing. So, I initially decided not to use this form.

However, I found things broke when I tried to remove it. I assume with greater knowledge or more experience I might find the compelling recipe for simplifying this file away. But, it is easier to keep it and move on rather than get stuck on a question not central to our project.

6. What is the best practice for arranging internal imports across a project?

I think one of the reasons I did not see a simple answer to the above question is the fact I have not yet fully understood the relationships between global and local variables and module functions and inheritance, all of which require a sort of grokking, I suppose, of namespaces.

I plan to continue to return to these questions as I learn more with subsequent installments and code development. If I encounter new insights or better ways to do things, my current intent is to return to any prior installments, leave the existing text as is, and then add annotations as to what I learned. If you have not seen any of these notices by now, I guess I have not later discovered better approaches. (Note: I think I began to get a better understanding about namespaces on the return leg of our build ’roundtrip’, roughly about CWPK #40 from now, but I still have questions, even from that later vantage point.)

New File Definitions

As one may imagine, the transition from notebook to module package has resulted in some changes to the code. The first change, of course, was to split the code into the starting pieces, including adding the __init__.py that signals the available cowpoke package. Here is the new file structure:

|-- PythonProject                                              
|-- Python
|-- [Anaconda3 distribution]
|-- Lib
|-- site-packages # location to store files
|-- alot
|-- cowpoke # new project directory
|-- __init__.py # four new files here
|-- __main__.py
|-- config.py
|-- extract.py
|-- TBA
|-- TBA

At the top of each file we place our import statements, including references to other modules within the cowpoke project. Here is the statement at the top of __init__.py (which also includes some package identification boilerplate):

from cowpoke.__main__ import *
from cowpoke.config import *
from cowpoke.extract import *

I should note that the asterisk (*) character above tells the system to import all objects within the file, a practice that is generally not encouraged, though is common. It is discouraged because of the amount of objects brought into a current working space, which may pose name conflicts or a burdened system for larger projects. However, since our system is quite small and I do not foresee unmanageable namespace complexity, I use this simpler shorthand.

Our __main__.py contains the standard start-up script that we have recently been using for many installments. You can see this code and the entire file by Running the next cell (assuming you have been following this entire CWPK series and have stored earlier distribution files):

Which environment? The specific load routine you should choose below depends on whether you are using the online MyBinder service (the ‘raw’ version) or local files. The example below is based on using local files (though replace with your own local directory specification). If loading from MyBinder, replace with the lines that are commented (#) out.
with open(r'C:\1-PythonProjects\Python\Lib\site-packages\cowpoke\__main__.py', 'r') as f:
    print(f.read())

(NB: Remember the ‘r‘ switch on the file name is to treat the string as ‘raw’.)

We move our dictionary definitions to the config.py. Go ahead and inspect it in the next cell, but realized much has been added to this file due to subsequent coding steps in our project installments:

with open(r'C:\1-PythonProjects\Python\Lib\site-packages\cowpoke\config.py', 'r') as f:
    print(f.read())

We already had the class and property dictionaries as presented in the CWPK #33 installment. The key change notable for the config.py, which remember is intended for where we enter run specifications for a new run (build or extract) of the code, was to pull out our specifications for the annotation extractor. This new dictionary, the extract_deck, is expanded later to embrace other run parameters for additional functions. At the time of this initial set-up, however, the dictionary contained these relatively few entries:

extract_deck = {
"""This is the dictionary for the specifications of each
extraction run; what is its run deck.
"""
'property_loop' : '',
'class_loop' : '',
'loop' : 'property_loop',
'loop_list' : prop_dict.values(),
'out_file' : 'C:/1-PythonProjects/kbpedia/sandbox/prop_annot_out.csv',
}

These are the values passed to the new annotation extraction function, def annot_extractor, now migrated to the extract.py module. Here is the commented code block (which will not run on its own as a cell):

def annot_extractor(**extract_deck):                                   # define the method here, see note
    print('Beginning annotation extraction . . .') 
    loop_list = extract_deck.get('loop_list')                              # notice we are passing run_deck to current vars
    loop = extract_deck.get('loop')
    out_file = extract_deck.get('out_file')
    class_loop = extract_deck.get('class_loop')
    property_loop = extract_deck.get('property_loop')
    a_dom = ''
    a_rng = ''
    a_func = ''
    """ These are internal counters used in this module's methods """
    p_set = ''
    x = 1
    cur_list = []
    with open(out_file, mode='w', encoding='utf8', newline='') as output:
        csv_out = csv.writer(output) 
             ...                                                       # remainder of code as prior installment . . . 

Note: Normally, a function definition is followed by its arguments in parentheses. The special notation of the double asterisks (**) signals to expect a variable list of keywords (more often in tutorials shown as ‘**kwargs‘), which is how we make the connection to the values of the keys in the extract_deck dictionary. We retrieve these values based on the .get() method shown in the next assignments. Note, as well, that positional arguments can also be treated in a similar way using the single asterisk (*) notation (‘*args‘).

At the command line or in an interactive notebook, we can run this function with the following call:

import cowpoke
cowpoke.annot_extractor(**cowpoke.extract_deck)

We are not calling it here given that your local config.py is not set up with the proper configuration parameters for this specific example.

These efforts complete our initial set-up on the Python cowpoke package.

Generalizing and Moving the Structure Extractor

You may want to relate the modified code in this section to the last state of our structure extraction routine, shown as the last code cell in CWPK #32.

We took that code, applied the generalization approaches earlier discussed, and added a set.union method to getting the unique list from a very large list of large sets. This approach using sets (that can be hashed) sped up what had been a linear lookup by about 10x. We also moved the general parameters to share the same extract_deck dictionary.

We made the same accommodations for processing properties v classes (and typologies). We wrapped the resulting code block into a defined function wrapper, similar for what we did for annotations, only now for (is-a) structure:

from owlready2 import * 
from cowpoke.config import *
from cowpoke.__main__ import *
import csv                                                
import types

world = World()

kko = []
kb = []
rc = []
core = []
skos = []
kb_src = master_deck.get('kb_src')                         # we get the build setting from config.py

if kb_src is None:
    kb_src = 'standard'
if kb_src == 'sandbox':
    kbpedia = 'C:/1-PythonProjects/kbpedia/sandbox/kbpedia_reference_concepts.owl'
    kko_file = 'C:/1-PythonProjects/kbpedia/sandbox/kko.owl'
elif kb_src == 'standard':
    kbpedia = 'C:/1-PythonProjects/kbpedia/v300/targets/ontologies/kbpedia_reference_concepts.owl'
    kko_file = 'C:/1-PythonProjects/kbpedia/v300/build_ins/stubs/kko.owl'
elif kb_src == 'extract':
    kbpedia = 'C:/1-PythonProjects/kbpedia/v300/build_ins/ontologies/kbpedia_reference_concepts.owl'
    kko_file = 'C:/1-PythonProjects/kbpedia/v300/build_ins/ontologies/kko.owl'    
elif kb_src == 'full':
    kbpedia = 'C:/1-PythonProjects/kbpedia/v300/build_ins/stubs/kbpedia_rc_stub.owl'
    kko_file = 'C:/1-PythonProjects/kbpedia/v300/build_ins/stubs/kko.owl'
else:
    print('You have entered an inaccurate source parameter for the build.')
skos_file = 'http://www.w3.org/2004/02/skos/core' 

kb = world.get_ontology(kbpedia).load()
rc = kb.get_namespace('http://kbpedia.org/kko/rc/')               

skos = world.get_ontology(skos_file).load()
kb.imported_ontologies.append(skos)
core = world.get_namespace('http://www.w3.org/2004/02/skos/core#')

kko = world.get_ontology(kko_file).load()
kb.imported_ontologies.append(kko)
kko = kb.get_namespace('http://kbpedia.org/ontologies/kko#')
def struct_extractor(**extract_deck):
    print('Beginning structure extraction . . .')
    loop_list = extract_deck.get('loop_list')
    loop = extract_deck.get('loop')
    out_file = extract_deck.get('out_file')
    class_loop = extract_deck.get('class_loop')
    property_loop = extract_deck.get('property_loop')
    x = 1
    cur_list = []
    a_set = []
    s_set = []
#    r_default = ''                                                     # Series of variables needed later
#    r_label = ''                                                       #
#    r_iri = ''                                                         #
#    render = ''                                                        #
    new_class = 'owl:Thing'
    with open(out_file, mode='w', encoding='utf8', newline='') as output:
        csv_out = csv.writer(output)
        if loop == class_loop:                                             
            header = ['id', 'subClassOf', 'parent']
            p_item = 'rdfs:subClassOf'
        else:
            header = ['id', 'subPropertyOf', 'parent']
            p_item = 'rdfs:subPropertyOf'
        csv_out.writerow(header)       
        for value in loop_list:
            print('   . . . processing', value)                                           
            root = eval(value)
            a_set = root.descendants()                         
            a_set = set(a_set)
            s_set = a_set.union(s_set)
        print('   . . . processing consolidated set.')
        for s_item in s_set:
            o_set = s_item.is_a
            for o_item in o_set:
                row_out = (s_item,p_item,o_item)
                csv_out.writerow(row_out)
                if loop == class_loop:
                    if s_item not in cur_list:                
                        row_out = (s_item,p_item,new_class)
                        csv_out.writerow(row_out)
                        cur_list.append(s_item)
                x = x + 1
    print('Total rows written to file:', x) 
struct_extractor(**extract_deck)
Beginning structure extraction . . .
. . . processing kko.predicateProperties
. . . processing kko.predicateDataProperties
. . . processing kko.representations
. . . processing consolidated set.
Total rows written to file: 9670

Again, since we can not guarantee the operating circumstance, you can try this on your own instance with the command:

cowpoke.struct_extractor(**cowpoke.extract_deck)

Note we’re using a prefixed cowpoke function to make the generic dictionary request. All we need to do before the run is to go to the config.py file, and make the value (right-hand side) changes to the extract_deck dictionary. Save the file, make sure your current notebook instance has been cleared, and enter the command above.

There aren’t any commercial-grade checks here to make sure you are not inadvertently overwriting a desired file. Loose code and routines such as what we are developing in this CWPK series warrant making frequent backups, and scrutinizing your config.py assignments before kicking off a run.

Additional Documentation

Here are additional guides resulting from the research in today’s installation:

NOTE: This article is part of the Cooking with Python and KBpedia series. See the CWPK listing for other articles in the series. KBpedia has its own Web site.
NOTE: This CWPK installment is available both as an online interactive file or as a direct download to use locally. Make sure and pick the correct installment number. For the online interactive option, pick the *.ipynb file. It may take a bit of time for the interactive option to load.
I am at best an amateur with Python. There are likely more efficient methods for coding these steps than what I provide. I encourage you to experiment — which is part of the fun of Python — and to notify me should you make improvements.

Posted by AI3's author, Mike Bergman Posted on September 11, 2020 at 10:27 am in CWPK, KBpedia, Semantic Web Tools | Comments (3)
The URI link reference to this post is: https://www.mkbergman.com/2371/cwpk-34-a-python-module-part-ii-packaging-and-the-structure-extractor/
The URI to trackback this post is: https://www.mkbergman.com/2371/cwpk-34-a-python-module-part-ii-packaging-and-the-structure-extractor/trackback/
Posted:September 10, 2020

Generalization, Packaging, and Complexity Compel More Powerful Tools

Over the past installments of this Cooking with Python and KBpedia series, we have been building up larger and more complex routines from our coding blocks. This approach has been great for learning and prototyping, but does not readily support building maintainable applications. This is a natural evolution in any code development that is moving towards real use and deployment. It is a step that Project Jupyter is also taking in its efforts to transition from Notebook to JupyterLab (see here). Their intent is to provide a complete code development environment as well as one suitable for interactive notebooks.

Recent announcements aside, we picked the Spyder IDE and installed it in CWPK #11 for these same functional reasons, and will stay with it throughout this series because of its maturity and degree of acceptance within the data science community. But, JupyterLab looks to be a promising development.

Whatever the tool, there comes a time when code proliferation and the need to manage it to a release condition warrants moving beyond prototyping. Now is that time with our project.

We will use the packaging of our extraction routines begun in the last installment as our example case for how to proceed. We will continue to use Jupyter Notebook to discuss and present code snippets, but that material is now to be backed up with methods, code files, and modules, hopefully in an acceptable Python way. We will be using Spyder for these development purposes and referring to it in our documentation with screen captures and discussion as appropriate. We will also be releasing Python files as our installments proceed. But the transition to working code is more complicated than changing tool emphasis alone.

Note: Though we begin formal packaging of our routines in this installment, it is not until CWPK #46 that a sufficient number of modules are developed to warrant the actual release of the package.

An obsession for many programmers, and not a bad one by the way, is to embrace a DRY (don’t repeat yourself) mindset that seeks to reduce duplicative patterns and to find generalities within code. Apparently, if properly done, DRY leads to easier to maintain and understandable code. It also increases inter-dependencies and places a premium on the architecture and modularization (the packaging) of the code base. Definitions of functions and methods and their organization are part of this. By no means do I have the experience and background to offer any advice in these areas, other than to try myself to identify and generalize repeatable patterns. With these caveats in mind, let’s proceed to package some code.

The Objective of These Three Parts

In this installment and the two subsequent ones, we will complete an extraction ‘module’ for KBpedia, and organize and package its functions and defintions. We will set up four program files: 1) an __init__.py standard file that begins a package; 2) a __main__.py code that sets the standard module setup and starting assignments; 3) a config.py file where we set initial parameters for new runs and define our shared dictionaries; and 4) an extract.py set of methods governing our specific KBpedia extraction routines. The first two files are a sort of boilerplate. The third file is intended for where all initialization specifications are entered prior to any new runs. I am hoping to set this project up in such a way that only changes need to be made to the config.py file prior to any given run. The fourth file, extract.py, is the meat of the extraction logic and routines and represents the first of multiple clusters of related functionality. As we formulate these clusters, we will also have a need to look at our overall code and directory organization a few installments from now. For the time being, we will focus on these four starting program files.

As we discussed in CWPK #18, a module is an individual Python file (*.py) that may set assignments, load resources, define classes, conduct I/O, or define or execute functions. A package in Python is a directory structure that combines one or more Python modules into a coherent library or set of related functions. We are ultimately aiming to produce an entire package of Python functions for extracting, building, testing, or using KBpedia.

In the first part of this three-part mini-series we will complete a generic method for extracting annotations to file for any of our objects in the KBpedia system. We will be pushing the DRY concept a little harder in this installment. In the second part, we will transition that generalized annotation extraction code from the notebook to a Python package, and extend our general approach to structure extraction. And, in the third part, we will modify the structure extraction to support individual typology files and complete the steps to a complete KBpedia extraction package. It is this baseline package to which we will add further modules as the remaining CWPK series proceeds.

Starting Routine

We again start with our standard opening routine. This set of statements, by the way, will be moved to the __main__.py module, with the file declarations going to the config.py module.

Which environment? The specific load routine you should choose below depends on whether you are using the online MyBinder service (the ‘raw’ version) or local files. The example below is based on using local files (though replace with your own local directory specification). If loading from MyBinder, replace with the lines that are commented (#) out.
kbpedia = 'C:/1-PythonProjects/kbpedia/sandbox/kbpedia_reference_concepts.owl'
# kbpedia = 'https://raw.githubusercontent.com/Cognonto/CWPK/master/sandbox/builds/ontologies/kbpedia_reference_concepts.owl'
skos_file = 'http://www.w3.org/2004/02/skos/core' 
kko_file = 'C:/1-PythonProjects/kbpedia/sandbox/kko.owl'
# kko_file = 'https://raw.githubusercontent.com/Cognonto/CWPK/master/sandbox/builds/ontologies/kko.owl'

from owlready2 import *
world = World()
kb = world.get_ontology(kbpedia).load()
rc = kb.get_namespace('http://kbpedia.org/kko/rc/')               

skos = world.get_ontology(skos_file).load()
kb.imported_ontologies.append(skos)
core = world.get_namespace('http://www.w3.org/2004/02/skos/core#')

kko = world.get_ontology(kko_file).load()
kb.imported_ontologies.append(kko)
kko = kb.get_namespace('http://kbpedia.org/ontologies/kko#')

More Initial Configuration

As noted in the objective, we also will codify the starting dictionaries as we defined in CWPK #32. As we begin packaging, these next two dictionary components will be moved to the config.py module.

typol_dict = {
             'ActionTypes'           : 'kko.ActionTypes',
             'AdjunctualAttributes'  : 'kko.AdjunctualAttributes',
             'Agents'                : 'kko.Agents',
             'Animals'               : 'kko.Animals',
             'AreaRegion'            : 'kko.AreaRegion',
             'Artifacts'             : 'kko.Artifacts',
             'Associatives'          : 'kko.Associatives',
             'AtomsElements'         : 'kko.AtomsElements',
             'AttributeTypes'        : 'kko.AttributeTypes',
             'AudioInfo'             : 'kko.AudioInfo',
             'AVInfo'                : 'kko.AVInfo',
             'BiologicalProcesses'   : 'kko.BiologicalProcesses',
             'Chemistry'             : 'kko.Chemistry',
             'Concepts'              : 'kko.Concepts',
             'ConceptualSystems'     : 'kko.ConceptualSystems',
             'Constituents'          : 'kko.Constituents',
             'ContextualAttributes'  : 'kko.ContextualAttributes',
             'CopulativeRelations'   : 'kko.CopulativeRelations',
             'Denotatives'           : 'kko.Denotatives',
             'DirectRelations'       : 'kko.DirectRelations',
             'Diseases'              : 'kko.Diseases',
             'Drugs'                 : 'kko.Drugs',
             'EconomicSystems'       : 'kko.EconomicSystems',
             'EmergentKnowledge'     : 'kko.EmergentKnowledge',
             'Eukaryotes'            : 'kko.Eukaryotes',
             'EventTypes'            : 'kko.EventTypes',
             'Facilities'            : 'kko.Facilities',
             'FoodDrink'             : 'kko.FoodDrink',
             'Forms'                 : 'kko.Forms',
             'Generals'              : 'kko.Generals',
             'Geopolitical'          : 'kko.Geopolitical',
             'Indexes'               : 'kko.Indexes',
             'Information'           : 'kko.Information',
             'InquiryMethods'        : 'kko.InquiryMethods',
             'IntrinsicAttributes'   : 'kko.IntrinsicAttributes',
             'KnowledgeDomains'      : 'kko.KnowledgeDomains',
             'LearningProcesses'     : 'kko.LearningProcesses',
             'LivingThings'          : 'kko.LivingThings',
             'LocationPlace'         : 'kko.LocationPlace',
             'Manifestations'        : 'kko.Manifestations',
             'MediativeRelations'    : 'kko.MediativeRelations',
             'Methodeutic'           : 'kko.Methodeutic',
             'NaturalMatter'         : 'kko.NaturalMatter',
             'NaturalPhenomena'      : 'kko.NaturalPhenomena',
             'NaturalSubstances'     : 'kko.NaturalSubstances',
             'OrganicChemistry'      : 'kko.OrganicChemistry',
             'OrganicMatter'         : 'kko.OrganicMatter',
             'Organizations'         : 'kko.Organizations',
             'Persons'               : 'kko.Persons',
             'Places'                : 'kko.Places',
             'Plants'                : 'kko.Plants',
             'Predications'          : 'kko.Predications',
             'PrimarySectorProduct'  : 'kko.PrimarySectorProduct',
             'Products'              : 'kko.Products',
             'Prokaryotes'           : 'kko.Prokaryotes',
             'ProtistsFungus'        : 'kko.ProtistsFungus',
             'RelationTypes'         : 'kko.RelationTypes',
             'RepresentationTypes'   : 'kko.RepresentationTypes',
             'SecondarySectorProduct': 'kko.SecondarySectorProduct',
             'Shapes'                : 'kko.Shapes',
             'SituationTypes'        : 'kko.SituationTypes',
             'SocialSystems'         : 'kko.SocialSystems',
             'Society'               : 'kko.Society',
             'SpaceTypes'            : 'kko.SpaceTypes',
             'StructuredInfo'        : 'kko.StructuredInfo',
             'Symbolic'              : 'kko.Symbolic',
             'Systems'               : 'kko.Systems',
             'TertiarySectorService' : 'kko.TertiarySectorService',
             'Times'                 : 'kko.Times',
             'TimeTypes'             : 'kko.TimeTypes',
             'TopicsCategories'      : 'kko.TopicsCategories',
             'VisualInfo'            : 'kko.VisualInfo',  
             'WrittenInfo'           : 'kko.WrittenInfo'
             }
prop_dict = {
            'objectProperties' : 'kko.predicateProperties',
            'dataProperties'   : 'kko.predicateDataProperties',
            'representations'  : 'kko.representations',
            }

The Generic Annotation Routine

So, now we come to the heart of the generic annotation extraction routine. For grins as much as anything else, I have wanted to take the DRY perspective and create a generic annotation extractor that could apply to any object or any aggregations of objects within KBpedia. I first tested it with the structure dictionary (typol_dict) and then generalized arguments and adding some additional extractors to handle properties (using prop_dict) as well. The routine as shown below accomplishes our desired extraction objectives.

You can Run this routine, but also change some of the switches to test class versus property extractions as well. To go through the entire set of typologies (typol_dict) takes about 8 minutes to process on a conventional desktop. All other combos including those for properties run much quicker.

I provide line-by-line comments as appropriate to capture the changes needed to generalize this routine. I also add some comments about how we will then break this code block apart in order to conform with the setup and configuration approach. Here is the routine, with the comments detailed below it:

import csv                                                              # #1

def render_using_label(entity):                                         # #14
    return entity.label.first() or entity.name
set_render_func(render_using_label)

x = 1                                                                   # #2
cur_list = []
class_loop = 0
property_loop = 1                                                       # #3
loop = property_loop                                                    # #15
loop_list = prop_dict.values()                                          # #4
print('Beginning annotation extraction . . .') 
out_file = 'C:/1-PythonProjects/kbpedia/sandbox/prop_annot_out.csv'     # #15
p_set = ''
with open(out_file, mode='w', encoding='utf8', newline='') as output:
    csv_out = csv.writer(output)                                        # #5
    if loop == class_loop:                                              # #6, #15
        header = ['id', 'prefLabel', 'subClassOf', 'altLabel', 'definition', 'editorialNote']
    else:
        header = ['id', 'prefLabel', 'subClassOf', 'domain', 'range', 'functional', 'altLabel', 
                  'definition', 'editorialNote']
    csv_out.writerow(header)    
    for value in loop_list:                                             # #7
        print('   . . . processing', value)                                           
        root = eval(value)                                              # #8                 
        p_set = root.descendants()                                      # #9, #15
        if root == kko.representations:                                 # #10
            p_set.remove(backwardCompatibleWith)
            p_set.remove(deprecated)
            p_set.remove(incompatibleWith)
            p_set.remove(priorVersion)
            p_set.remove(versionInfo)
            p_set.remove(isDefinedBy)
            p_set.remove(label)
            p_set.remove(seeAlso)
        for p_item in p_set:
            if p_item not in cur_list:                                  # #11
                a_pref = p_item.prefLabel
                a_pref = str(a_pref)[1:-1].strip('"\'')                 # #12
                a_sup = p_item.is_a
                for a_id, a in enumerate(a_sup):                        # #13
                    a_item = str(a)
                    if a_id > 0:
                        a_item = a_sup + '||' + str(a)
                    a_sup  = a_item
                if loop == property_loop:                               # #3     
                     a_dom  = p_item.domain
                     a_dom  = str(a_dom)[1:-1]
                     a_rng  = p_item.range
                     a_rng  = str(a_rng)[1:-1]
                     a_func = ''
                a_item = ''
                a_alt  = p_item.altLabel
                for a_id, a in enumerate(a_alt):
                    a_item = str(a)
                    if a_id > 0:
                        a_item = a_alt + '||' + str(a)
                    a_alt  = a_item    
                a_alt  = a_item
                a_def  = p_item.definition
                a_def = str(a_def).strip('[]')
                a_note = p_item.editorialNote
                a_note = str(a_note)[1:-1]
                if loop == class_loop:                                  # #6
                    row_out = (p_item,a_pref,a_sup,a_alt,a_def,a_note)
                else:
                    row_out = (p_item,a_pref,a_sup,a_dom,a_rng,a_func,a_alt,a_def,a_note)
                csv_out.writerow(row_out)                               # #1
                cur_list.append(p_item)
                x = x + 1
print('Total rows written to file:', x)                                 # #16
Beginning annotation extraction . . .
. . . processing kko.predicateProperties
. . . processing kko.predicateDataProperties
. . . processing kko.representations
Total rows written to file: 4843

Here are some of the specific changes to the routine above, keyed by number, to accommodate our current generic and DRY needs versus the first prototype presented in the earlier CWPK #30:

  1. We need to import the csv module at this point to make sure we can format longer text (definitions, especially) with the proper escaping of delimiting characters such as commas, etc.
  2. We’re putting some temporary counters in to keep track of the number of items we process
  3. Our generic annotation extraction method allows us to specify whether we are processing classes or properties
  4. Our big, or outer, loop is to cycle over the entries in our starting dictionary. Each one of these is a root with a set of child elements
  5. Here is where we switch out the writer to enable proper escaping of large text strings, etc., for CSV
  6. We’re checking on whether it is classes or properties we are looping over, and switching the number of columns thus needed for the outputs. The next code enables us to put a single-row header in our CSV files to label the output fields
  7. We take the big chunks of the combined roots in our starting dictionaries
  8. And we convert them to strings for easier later manipulation (also see the prior installment for cautions about eh eval() method
  9. The heart of this routine is to grab all of the descendant sub-items from our starting root
  10. This is a temporary kludge because possibly namespace or assignment errors require us to trap these annotations from our standard set; these properties are all part of the starting core KKO ontology ‘stub’
  11. Since there are many duplicates across our groupings, this check ensures we are only adding new assignments to our results. It effectively is a duplicate-removal routine
  12. We need to make some one-off string changes in order for our actual output to conform to an expected CSV file
  13. As discussed in prior CWPK installments, some record fields allow for more than one entry. This general routine loops over those sub-set members, making the format changes and commitments as indicated
  14. This part of the code block will be moved to the setup.py module, since how we want to render our extractions will be shared across modules
  15. Will move all of these items to the config.py module
  16. A little feedback for grins.

If you inspect the code base, for example, you will see that many of the parts above have been broken out into different files.

BTW, if you want to see the members of the outer loop set, you can do so with this code snippet (set your own root):

root = kko.representations                 
p_set = root.descendants()
print(p_set)
length = len(p_set)
print(length)

Based on the changes described in the comment notes and embedding this generic annotation routine into its own method, annot_extractor, will end up with this deployed code structure:

__main__.py material
config.py material

def annot_extractor (arg1, arg2)

We’re now ready to migrate this notebook code to a formal Python package and to extend the method to the structure extractor, the topics of our next installment.

Additional Documentation

Style guidelines and coding standards should be near at hand whenever you are writing code. That is because code is meant to be shared and understood, and conventions and lessons regarding readability are a key part of that. Here are some references useful for whatever work you choose to do with Python:

NOTE: This article is part of the Cooking with Python and KBpedia series. See the CWPK listing for other articles in the series. KBpedia has its own Web site.
NOTE: This CWPK installment is available both as an online interactive file or as a direct download to use locally. Make sure and pick the correct installment number. For the online interactive option, pick the *.ipynb file. It may take a bit of time for the interactive option to load.
I am at best an amateur with Python. There are likely more efficient methods for coding these steps than what I provide. I encourage you to experiment — which is part of the fun of Python — and to notify me should you make improvements.

Posted by AI3's author, Mike Bergman Posted on September 10, 2020 at 11:12 am in CWPK, KBpedia, Semantic Web Tools | Comments (0)
The URI link reference to this post is: https://www.mkbergman.com/2370/cwpk-33-a-python-package-part-i-the-annotation-extractor/
The URI to trackback this post is: https://www.mkbergman.com/2370/cwpk-33-a-python-package-part-i-the-annotation-extractor/trackback/