


AdvancedTinyMCE
Download, Installation, Documentation and How to Modify this WordPress Plug-in
Turn your existing WordPress editor into the following WYSIWYG powerhouse:
Thanks to Chris Carson of Navy Road Software, I am pleased to announce the new version 0.5.0 of the Advanced TinyMCE Editor for WordPress. The Advanced TinyMCE Editor plug-in builds from previous releases by Assaf Arkin of Labnotes and me (see earlier documentation), and updates it to be compatible with the current WordPress v. 2.2.
The Advanced TinyMCE Editor plug-in:
- Doubles the editor’s available functions to 60, adding important functional areas such as table, styles, inserts, and others
- Improves existing functionality in handling images, links, etc.
- Corrects errors and arbitrary restrictions in the standard WordPress visual editor, and
- Provides easy Control Panel configuration of your WordPress editor.
This version 0.5.0 upgrade, largely from Chris, makes these improvements:
- Provides improved control panel control of the Advanced TinyMCE plug-in
- Allows you to add and enter new style sheets without needing to modify code
- Allows you to configure which advanced buttons appear on or off in the editor
- Provides guidance on earlier width problems, esp. for small screen (800 x 600) older laptops.
Again, Chris, many thanks!
These changes have also led to complete updates to the download and installation, installation gotchas, detailed features, and how-to-modify instructions below.
TinyMCE and its advanced options are from Moxiecode Systems AB. Please note that the Advanced TinyMCE Editory plug-in has not been tested in WP versions prior to 2.2 and has not been tested in all browsers beyond Firefox and IE. Comments and improvements are welcomed!
Download
Download version 0.5.0 of the zipped Advanced TinyMCE Editor from here (advanced_tinymce_050.zip; 192 kb)
Installation
Installation instructions are:
- Back-up the files in the two specific subdirectories used by the Advanced TinyMCE Editor as noted below
- Download the zip file; unzip into a temporary reference location
- First, copy over the entire Advanced TinyMCE subdirectory over to your standard plug-in directory:
/wordpress home or root - that is, your WP starting point/
/wp-content/
/plug-ins/
advanced-tinymce subdirectory [copied here]
Once copied over, the subdirectory will contain three files: advanced-tinyMCE.php, control_panel.php and a read_me.txt file.
- Second, update the TinyMCE js plug-ins directory by copying the multiple files in the subdirectory created from the extracted download. The target location for these files on your local system may be found at:
/wordpress home or root - that is, your WP starting point/
/wp-includes/
/js/
/tinymce/
/plug-ins/
[subdirectories for plug-in additions -- copy here]
Please note that your target subdirectory will itself already include a number of additional TinyMCE plug-ins that came as part of the standard WP installation; do not erase these! They supplement the new functionality you just added.
- Under the Plugins menu item in your WP administration center, activate the Advanced TinyMCE Editor option (if this plug-in does not display, you did not correctly finish Step #3 above)
- Go to the Options menu item in your WP administration center, then Advanced TinyMCE and make configuration choices (see next section). You must save settings from this Control Panel screen before the plug-in becomes active
- Go to the Visual editor under the Write or Manage menu options within your WP administation console
- If you do not see the options and buttons you earlier selected, you will need to clear your browser cache (esp. for Firefox, which will likely require a full Clear Private Data flush, see below) and then refresh the page
- Begin editing and then Enjoy!
Unlike normal plug-ins, the need for Step #4 results from the tight integration of the distributed TinyMCE in WordPress.
If you have any problems, carefully repeat the above steps. If problems still remain, re-install your original configuration from the backups.
Control Panel Configuration
Once the Advanced TinyMCE Editor plug-in is installed, you configure the editor for style sheets and which buttons you want to have active from the Control Panel. This panel is accessed via the Options > Advanced TinyMCE menu items on the WP administration center:

[Click on image for full-size pop-up]
Please note that you must Save Settings on this display before your changes become active. And, when first installed, you also need to select Save Settings to initially activate the plug-in.
Adding and Changing Styles
The Advanced TinyMCE Editor enables you to make assignments and display user-defined styles via dropdown lists. You can add any style sheets you wish (typically, ‘style.css‘) in the Control Panel, and their embedded styles will then become available for assignment and display in the editor.
To enter a new style sheet, you must provide the full URL path in the Control Panel dialog (including the http://!). See the example in the above figure. Also, you can enter multiple style sheets, so long as each one is separated by a comma.
Note: Stylesheets containing complex declarations may not be displayed correctly by the Advanced TinyMCE Editor. Make sure the stylesheets entered here contain only simple class declarations, e.g., “.someclass”. If you see a stylesheet declaration not show up in the Editor, consider splitting out the direct and simpler declarations into a separate file.
If you are familiar with earlier operation of this plug-in, you will know that style sheets are initially specified in the tiny_mce_config.php file (see discussion under Deprecated below). You may still do so, and any style sheets in this file will also appear within the editor dropdown lists. However, only style sheets that you enter directly on the Control Panel willl appear in this Control Panel dialog.
This feature to add your own style sheets can also be helpful when you are testing many style options. You can temporarily define a test_styles.css file somewhere on your system, modify individual styles and refine what you may then want to later keep. After testing, you can save your final styles to a permanent style sheet location and delete the temporary style sheet reference from the Control Panel.
Note: When you change or add style sheets, you may need to do a cache flush using Clear Private Data within Firefox (see below) due to a known browser bug before your changes show in the editor.
Editing Button Display
The 60 or more functions in the Advanced TinyMCE Editor are organized by row and clustered by group. A group is separated by others within a row by a separator bar.
Chances are that some or many of the functions in the Advanced TinyMCE Editor may not be of interest or use to you personally. The Control Panel enables you to select which of these functions will display in the editor. If all items in a given group are unchecked, the entire group and its separator bar will also not display.
The Advanced TinyMCE Editor adheres to the plug-in philosophy of not requiring any changes to the underlying WordPress code, including its baseline use of the standard, simple TinyMCE. Thus some choices are limited in the plug-in, such as the restriction that only three rows of buttons are available (among others). The rather fixed choices in the Control Panel for functions and buttons is a result of this philosophy.
Note: When you change editor buttons, you may need to do a cache flush using Clear Private Data within Firefox (see below) due to a known browser bug before your changes show in the editor.
Editor Width
Early distributions of the Advanced TinyMCE Editor caused sporadic complaints regarding crowding or overlapping of display buttons on smaller displays. This issue is particularly acute for older laptops limited to 800 x 600 displays. Under the worst case, that is combining all buttons and a small display, you can see something like the following (800 x 600 basis):

[Click on image for full-size pop-up]
This is because the starting basis for advanced functionality in TinyMCE is hardwired into three rows, and each row forces the absolute width. However, even with such a small display, if you are willing to remove buttons (about 35% in total), you can still achieve a functional editing area:

[Click on image for full-size pop-up]
Of course, a display this narrow has its own limitations. (Which is one of the reasons that 800-width displays are rapidly phasing out.)
At a 1024-width, there is still some overlap, as the following diagram shows. But, only removal of a few buttons can produce a very acceptable editing display area, and most users can easily remove some functionality (I personally do not have a need for R-to-L word wrapping and some of the Microsoft-specific functionality.)

[Click on image for full-size pop-up]
By the time display widths reach 1280, all buttons and functionality can clearly be displayed. (Again, many users will still choose to remove some unused buttons in any event.)

[Click on image for full-size pop-up]
(Some of these screen captures at lower resolutions are poor given the dynamics of my current flat-screen display.)
If these approaches are still not satisfactory, it is necessary to directly modify the underlying code.
Note: When you remove editor buttons from display, you may need to do a cache flush using Clear Private Data within Firefox (see below) due to a known browser bug before your changed display width shows in the editor.
Functional Description
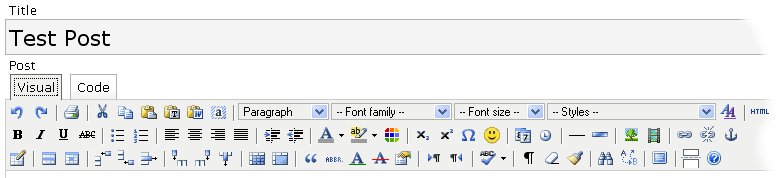
The result of the complete installation is shown in this figure. Each of the buttons is described below. Note if you modify your actual file (see below) that the number of your buttons and their order may change from this screen!:
This image shows three rows (A, B, C) of 60 buttons and dropdown lists, each of which is described below by row, group number and item from left-to-right. New functionality added by virtue of this Advanced TinyMCE plug-in above the standard advanced options in WordPress is shown with an asterisk (*).
From top-to-bottom and left-to-right, these buttons are:
- A1a — ‘Undo” levels, typically set to 10 steps
- A1b — ‘Redo‘ levels, typically set to 10 steps
- A2 — standard ‘Print‘ for the post/page in the editor *
- A3a — standard ‘Cut‘; may be limitations in some browser configurations *
- A3b — standard ‘Copy‘; may be limitations in some browser configurations *
- A3c — standard ‘Paste‘; may be limitations in some browser configurations
- A3d — ‘Paste Text‘ for pasting without formatting; may be limitations in some browser configurations *
- A3e — ‘Paste Word‘ for pasting Word with some formatting retained; may be limitations in some browser limitations *
- A3f — ‘Select All‘ in the editor window *
- A4a — ‘Format‘ dropdown according to standard CSS styles
- A4b — ‘Font Family‘ dropdown to select font typeface *
- A4c — ‘Font Size‘ dropdown to select font size *
- A4d — ‘Styles‘ dropdown to pick existing styles *
- A4e — ‘CSS Style‘ brings up a comprehensive popup dialog for editing or entering new styles, enabling styles to be edited visually *
- A5 — the ‘HTML‘ button brings up a direct HTML editing window, with all code shown. Unlike the Code tab, all HTML codes are shown (but with conversion errors corrected; see discussion above) *
- B1a — ‘Bold‘; standard function
- B1b — ‘Italics‘; standard function
- B1c — ‘Underline‘; standard function
- B1d — ‘Strikeout‘; standard function
- B2a — ‘Bullet List‘ is a standard function per existing CSS formatting
- B2b — ‘Number List‘ is a standard function
- B3a — ‘Justify Left‘, applied to highlighted text
- B3b — ‘Justify Center‘, applied to highlighted text
- B3c — ‘Justify Right‘, applied to highlighted text
- B3d — ‘Justify Full‘, stretch text to margins for highlighted text
- B4a — ‘Indent‘ highlighted text, sometimes treated as <blockquote>
- B4b — ‘Outdent‘ to return indented text to standard left margin
- B5a — ‘Text Color‘ enables highlighted text to have color changed *
- B5b — ‘Background Color‘ enables background for highlighted area to have color changed *
- B5c — ‘Text/Background Color Selector‘ is a more general option for choosing any RGB value for text or background *
- B6a — ‘Subscript‘ enables that for the highlighted text *
- B6b — ‘Superscript‘ enables that for the highlighted text *
- B6c — the ‘Character Map‘ brings up a popup dialog to insert special characters and symbols *
- B6d — the ‘Emotions‘ button brings up a popup for a choice of emoticons *
- B7a — ‘Insert Date‘ provides a date insert at the point of the cursor; format is settable *
- B7b — ‘Insert Time‘ provides a time insert at the point of the cursor; format is settable *
- B8a — the ‘Horizontal Rule‘ inserts a standard rule at the point of the cursor *
- B8b — the ‘Advanced Horizontal Rule‘ allows the rule to have its formatting set via a popup menu *
- B9a — ‘Image‘ brings up an advance image dialog, including image swaps *
- B9b — ‘Media‘ enables Flash, Shockwave, etc., to be inserted at cursor position with settable parameters (not fully tested) *
- B10a — ‘Link‘ is a more advanced link insertion and settings popup *
- B10b — ‘Unlink‘ removes existing link settings *
- B10c — ‘Anchor‘ enables anchor tags to be set in the current document *
- C1a — ‘Table‘ insert or edit an existing table; major functionality, with specifics covered in the next few buttons *
- C1b — ‘Table Row‘ for modifying entire table rows at a time *
- C1c — ‘Table Cell‘ for setting specific table cell properties *
- C1d — ‘Insert Row Before‘ *
- C1e — ‘Insert Row After‘ *
- C1f — ‘Delete Row‘ *
- C1g — ‘Insert Column Before‘ *
- C1h — ‘Insert Column After’ *
- C1i — ‘Delete Column‘ *
- C1j — ‘Split Merged Table Cells‘, as described *
- C1k — ‘Merge Table Cells‘ for the highlighted selection *
- C2a — ‘Citation‘ provides a means to put <cite> tags on highlighted text *
- C2b — ‘Abbreviation‘ provides a means to put <abbr> tags on highlighted text *
- C2c — ‘Insert‘ provides a means to put <ins> tags on highlighted text *
- C2d — ‘Delete‘ proovides a means to put <del> tags on highlighted text *
- C2e — ‘Attributes‘ provides a means to put <attr> tags on highlighted text *
- C3a — ‘Direction LtR‘ sets scrolling and editing from left-or-right *
- C3b — ‘Direction RtL‘ sets scrolling and editing from right-to-left *
- C4 — ‘Spellchecker‘ toggles spell checking off or on; may work off of IE spell lists; also see documentation about spelling lists *
- C5a — ‘Visual Characters‘ provides screen display of hidden characters like spaces (via and tab, etc) *
- C5b — ‘Remove Formatting‘ actually has fairly minimal impact by removing cell and related spacing and formatting. Apparently has minimal effect on embedded codes; it’s use needs better documentation *
- C5c — ‘Cleanup‘ is also not apparent, likely requires poor code base; not yet fully tested *
- C6a — ‘Find‘ brings up a popup to search for the given string *
- C6b — ‘Replace‘ allows replacement of the found search string *
- C7 — ‘Fullscreen‘ expands the current editor space to occupy to full screen *
- C8a — the ‘More‘ tag is a specific WordPress option for splitting posts into a summary and detailed entry, split at the point of insertion
- C8b — ‘Help‘ brings up a minimal (unfortunately) WP-specific help on the editor; not very useful.
Please note that the behavior and functionality of the image (B9a) and link (B10a) are also improved over the standard WordPress distribution.
If you would like more information on the various button names, see the initial TinyMCE documentaton at: http://wiki.moxiecode.com/index.php/TinyMCE:Control_reference.
Known Issues
These are the known issues with WordPress v. 2.2 and this plug-in.
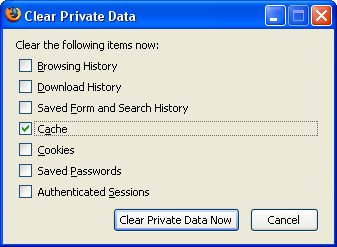
A Firefox Gotcha: Clear Private Data Caching Flush
One problem common to the Firefox browser is the need to clear the cache before you see the plug-in buttons display properly. To do so, go to the main menu Tools > Clear Private Data and then set the screen as shown and clear the data.
| Important for Firefox users! |
Standard Advanced Toggle
Apart from this plug-in, which corrects this hidden requirement, the standard WordPress distribution requires a toggle of Alt-V (IE) or Shift-Alt-V (Firefox) to toggle the standard editor’s advanced buttons on and off.
Color Picker
The ‘More Colors’ option on the Advanced TinyMCE brings up a blank popup. (See http://trac.wordpress.org/ticket/4288.)
In part to overcome this issue, I added an additional color picker from this source: http://tinymce.moxiecode.com/punbb/viewtopic.php?pid=16270. See B5c above.
Control Panel Display in IE
There are some minor display problems of the Control Panel in Internet Explorer. They do not affect operation.
Possible WordPress v. 2.2 Issues
As an earlier post by me summarized (with other external references), there are issues of compatibility with many current plug-ins and WordPress v. 2.2. You may encounter problems with the Advanced TinyMCE Editor for these reasons, which may have nothing to do with the plug-in itself and may be devilishly difficult to diagnose and remedy.
I expect releases after WP v. 2.2 to get increasingly stable.
Instructions for Your Own Modifications
The actual Advanced TinyMCE Editor plug-in is quite simple, even though installation is a little more complicated than for a standard WordPress plug-in. This complication is because of the added step of adding the new plug-in subdirectories to TinyMCE’s own JavaScript listings (see Step #4 under ‘Download and Installation’ above).
But, with a little bit of familiarity, the simplicity of all of this becomes quite clear, which should enable you to make your own modifications and extensions.
There are two simple parts to the plug-in. The first part is to place changed or added functionality into the plug-in subdirectories to TinyMCE’s own JavaScript listings (see Step #4 under ‘Download and Installation’ above). (Note simple re-ordering or removal of buttons does not require this part.) The second part is that the WordPress plug-in file — advanced-tinyMCE.php — (see Step #3 under ‘Download and Installation’ above) may also require some modifications. These are straightforward and described below for a couple of scenarios.
With the instructions below, you should be able to remove, add, change the order of buttons, change editor behavior when in ‘code’ mode and update the system on your own when new releases of TinyMCE or WordPress are issued.
Changing Group and Button Display Orders
To change the group or button display orders in the Advanced TinyMCE Editor, you will need to edit the advanced-tinyMCE.php file (the one placed into your standard /plug-ins/ directory), starting at about line 47. The basic layout of this portion of the file is shown below:
  $this->arr_btns = array(
  array(
  array( "undo", "redo"),
  array( "print"),
  array( "cut", "copy", "paste","pastetext", "pasteword","selectall"),
  array( "formatselect","fontselect", "fontsizeselect", "styleselect", "styleprops"),
  array( "code")
  ),
  array(
  array( "bold", "italic", "underline", "strikethrough"),
  array( "bullist", "numlist"),
  array( "justifyleft", "justifycenter", "justifyright", "justifyfull"),
  array( "indent", "outdent"),
  array( "forecolor", "backcolor", "advcolor"),
  array( "sub", "sup", "charmap", "emotions"),
  array( "insertdate", "inserttime"),
  array( "hr", "advhr"),
  array( "image", "media"),
  array( "link", "unlink", "anchor")

  ),
  array(
  array( "tablecontrols"),
  array( "cite", "abbr", "acronymn", "ins", "del", "attribs"),
  array( "ltr", "rtl"),
  array( "iespell", "spellchecker"),
  array( "visualchars", "removeformat","cleanup"),
  array( "search", "replace"),
  array( "fullscreen"),
  array( "wp_more", "wp_help")
  )
  );
You can see this layout corresponds to the rows above (A, B, C, the first set of inset ‘arrays’) and then group (the second set of inset ‘arrays’) and then finally order within each group.
The naming correspondence between a button label and its actual button should be evident in comparison with the functional listings above. (Note, a couple of the named array items are “extra” in that they do not result in a corresponding button display; for example, ‘iespell’.)
To change these orders and displays, simply manipulate the row and group items. Note you are limited to the three row arrays. Also note that, when completed, your edits will cause each group to be separated from the following one by a separator bar on the Advanced TinyMCE menu display.
When you make such changes, always be careful about your use and location of quotes, syntax characters and spelling! Note each array listing must start and end with the parentheses.
Adding Functionality
If you discover new functionality that you want to add to the editor, three steps are necessary.
- First, you must copy the functionality file or subdirectory to the TinyMCE JS /plug-ins/ subdirectory (not your standard WP one!) (see Step #4 under ‘Download and Installation’ above).
- Second, add the new function to the extended function array in the same advanced-tinyMCE.php file, beginning at about line 38:
function Advanced_TinyMCE_Editor(){
$this->arr_plugins = array(
"advcolor", "advhr", "advimage", "advlink",
"cleanup", "contextmenu", "directionality", "emotions",
"fullscreen", "iespell", "insertdatetime", "media",
"print", "searchreplace", "style", "table",
"visualchars", "wphelp", "xhtmlxtras");
The name corresponds directly with the file name entered under the plug-ins subdirectory. The order of entry does not matter.
- And, then, third, add the associated button name (it should be described in the add-in functionality) to one of the three arrays noted above for ‘Changing Group and Button Display Orders’.
That’s it!
You should note that Moxiecode maintains a wiki with listings of additional plug-ins, and also keeps a series of look-up pages (check out all of the dropdown list pages!) for TinyMCE’s own included advanced functionality. There are also other add-ins that you might find at SourceForge or with a Google search.
Changing Code Processing
Since at least the WordPress 2.1 release, the TinyMCE editor has had the nasty habit of removing <div> tags when toggling between ‘Visual’ and ‘Code’ views.
This comes from the WP team’s (arbitrary) decision about this matter (and many others, see below). The code causing this nasty change is in the initial configuration file for TinyMCE, generally found under this path:
/path-to-wordpress/wp-includes/js/tinymce/tiny_mce_config.php
In that file you’ll see this code:
$valid_elements =
'p/-div[*],-strong/-b[*],-em/-i[*],-font[*],-ul[*],-ol[*],-li[*],*[*]';
What this code basically says is to replace all <div> tags with <p> tags, <b> and <i> with <strong> and <em> respectively, keep all font and bullet tags, and then, as a capper, keep all remaining all other tags not specifically listed (*[*]).
Actually, this is all pretty good practice to use valid XHTML, except for the curious <div> replacement.
TinyMCE offers nice control of such parsing matters, but it definitely is not a good idea to make changes directly to the WordPress supplied configuration files. Rather, I isolated such changes to the Advanced TinyMCE plug-in code itself. Thus, this code is now added to the plug-in advanced-tinyMCE.php file:
function extended_editor_mce_valid_elements($valid_elements) {
 $valid_elements = '-strong/-b[*],-em/-i[*],-font[*],-ul[*],-ol[*],-li[*],*[*]';
 $valid_elements = apply_filters('extended_editor_mce_valid_elements', $valid_elements);
 return $valid_elements;
}
Note that the only change I made was to remove the unwanted <div> with <p> replacement.
Note, you could make your own changes within these same lines of code. For example, Moxiecode provides a set of instructions to make your code completely XHTML compliant (see bottom of page). That documentation and related material on the TinyMCE wiki site are probably worth inspecting if you are going to get aggressive about making your own code changes (but, proceed with caution!).
Of course, these are fairly fundamental changes in that they act to re-write underlying page code. Use at your own risk and you are on your own! ![]()
BTW, I’d like to thank Tim Rohrer for pointing me in the right direction for this fix.
What to Do in the Case of Future Upgrades?
To keep current with new releases in either WP or TinyMCE, you can follow the same steps as what was outlined for ‘Adding Functionality’ above. Simply inspect the current TinyMCE functions, those supplied with the new version (as they come out) of WP, and make your desired updates and corrections.
Deprecated from Version 0.4.0 Documentation
This topic applies to the earlier 0.4.0 distribution, but has been deprecated in the current version. It no longer applies to Advanced TinyMCE version 0.5.0!
Including Your Own Styles
After invoking the Advanced TinyMCE Editor, the styles dropdown list is only initially populated with two internal WordPress styles, mce_plugins_wordpress_more and mce_plugins_wordpress_page.
To include your own styles, you will need to find and edit the tiny_mce_config.php file located here:
/wordpress home or root - that is, your WP starting point/
/wp-includes/
/js/
/tinymce/
[tiny_mce_config.php located here]
At approximately line 45 in that file, you will see reference to the standard WP style that is used. You can add your own style(s) to it by adding a comma and then entering the relative URL location of your specific styles, as shown in yellow below:
$mce_css = get_option(‘siteurl’) . ‘/wp-includes/js/tinymce/plugins/wordpress/wordpress.css, /wp-content/themes/[your_theme]/[your_style.css]‘;
Do not forget the comma!, don’t word wrap, and pay attention to quotes and semicolons.
Note that my own system uses relative URL addressing (yours may differ!) by setting a specific blog address URL under General Options in my WP admin center. Also note that you will need to substitute your specific theme and style names. Finally, you may need to clear your browser’s cache (see instructions for Firefox above) in order to have the new styles properly populate the dropdown list.
I’d like to thank Jules on the Web Veteran blog site for the tip underlying this earlier change. Jules’ posting has other useful TinyMCE hints as well.
Last Updated 7/16/07
Hey Mike, Thanks for the awesome “Advanced TinyMCE Editor” plugin. I am NOT a programmer but, with the help of your application, I was able to do things that would have taken me eons longer. Sometimes I notice the actual tools come and go, which seems weird. In other words, sometimes they revert back to the original tools. And not all the tools you show above are in my icon panel, but some of the most needed are there.
Question: Do you have any idea if this code could create a security vulnerability? I was hacked and my site was destroyed so I’m trying to run down all the possibilities. My assumption is that it was a brute attack against my password, but like I said, I want to do everything to make certain I don’t have other weaknesses through various plugins.
Thanks again. BTW, I’m working on WordPress 3.1 and have the Twenty10 theme.