Posted:July 27, 2005

A previous post asserts the creation and use of document assets are worth trillions of dollars per year to the US economy ("Untapped Assets:  The $3 Trillion Value of U.S. Enterprise Documents").  When published, this number indeed appeared huge and perhaps unbelievably so (the actual calculation was $3.26 trillion or 31% of total annual gross national product, GNP).  To test this number, I set off to find some triangulating information.  Two recent studies, plus an interesting history of prior ones, tend to support the $3 trillion conclusion for document assets.

Apte and Nath National Income Accounts

The first study was a publication from the UCLA Anderson School of Management on Business and Information Technologies.  This study by Apte and Nath, "Size, Structure and Growth of the US Information Economy," is essentially an update of earlier analyses by Porat.

(Fritz Machlup’s seminal 1962 book The Production and Distribution of Knowledge in the United States was the first to coin the terms "knowledge industry" and "knowledege worker." It noted that 29 percent of the US GNP in 1958 was generated by the knowledge industry.  Machlup’s death prevented him from completing his planned ten-volume series on Knowledge:  Its Creation, Distribution and Economic Significance, though US Census data were subsequently collected and published using his methodology for the economic effects of the knowledge industry for the years 1958, 1963, 1967, 1972 and 1980.  The latest portions of that series were an update of his unpublished last volume completed by Mary Huber and Michael Rubin in 1986 entitled, The Knowledge Industry in the United States:  1960-1980.)

(Machlup’s efforts were updated by Marc Porat for 1967 using a different methodology based on national income accounts, an approach that is less complete and comprehensive than Machlup’s, but which has the advantage of relying on standard data collection. This effort, also published with Michael Rubin in 1977, The Information Economy, was also adapted as the methodology for cross-country comparisons by the OECD in the 1980’s.)

Using the Porat methodology, Apte and Nath updated figures for the size of the US knowledge economy in 1992 and 1997 (there are delays of about 3-4 years in the publication of the 5-yr data series from the Census).  These December 2004 findings in millions of current dollars, compared to the earlier 1967 numbers, are:

Sector
1967
1992
1997
Information Value

$368,098
(46.3%)

$3,483,069
(55.9%)

$5,257,540
(63.0%)

Total GNP $795,388 $6,233,905 $8,345,646

The percentages indicate the contribution from information to the total GNP. This analysis suggests nearly two-thirds of recent US GNP is due to information or knowledge industry contributions, a percentage that has been growing over time.  These amounts seem to be at the same order of magnitude and consistent with my earlier conclusion for about 30% of GNP devoted to document assets.

Nakamura Intangible Assets 

The second study that appears to triangulate with my earlier $3 trillion value is based on an entirely different data set and methodology.  Leonard Nakamura, an economist with the Federal Reserve Board in Philadelphia, published a working paper in 2001 entitled, "What is the U.S. Gross investment in Intangibles?  (At Least) One Trillion Dollars a Year!"  This is one of the first attempts to measure intangible investments, defined as private expenditures on assets that are intangible and necessary to the creation and sale of new or improved products and processes, including designs, software, blueprints, ideas, artistic expressions, recipes, and the like. Document creation is thus a component of intangible assets, but by no means the only form of intangible asset.

Nakamura’s paper is acknowledged as being preliminary.  Direct and indirect empirical evidence suggest that US private firms invest at least $1 trillion annually (as of 2000, the basis year for the data) in intangible assets.  Private expenditures, labor and corporate operating margins were the three measurement methods.  The study also suggests that the capital stock of intangibles in the US has an equilibrium market value of at least $5 trillion.

These numbers are obviously less than my own estimates.  However, Nakamura’s basis for definiing intangible assets is quite narrow and does not include any measure for document creation itself, and instead focuses on a rather limited range of documented outcomes such as R&D, patents and software expenditures.

There are obviously differences in expenses associated with the labor involved in document creation, which percent of GNP attempts to measure, and the value of the documents so created, which an asset or stock market valuation method as used by Nakamura would measure.

Some Final Thoughts

The combination of my earlier paper and these two different methodological approaches suggest there are still broad gaps in how to best define the importance of documents, the costs of creating and using them, and the final "asset" value that they bring to an enterprise. The knowledge or information economy is obviously the broadest measure possible, with percent estimates as a contribution to GNP upwards of 65%. On the basis solely of a more narrowly defined intellectual value proxy (R&D, patents, advertising, copyrights, trademarks, etc.) , total percentage of GNP may be as low as 12%.  Our estimate that document creation and use accounts for about 31% of total GNP would thus appear to reside comfortably as a reliable estimate between these two alternative valuation methods.

In any case, the magnitude of these contributions is not under question.  No matter how one measures it, every trillion dollars is a very large number indeed.

Posted by AI3's author, Mike Bergman Posted on July 27, 2005 at 11:41 am in Adaptive Information, Document Assets | Comments (0)
The URI link reference to this post is: https://www.mkbergman.com/110/a-trillion-is-a-large-number-12-zeros/
The URI to trackback this post is: https://www.mkbergman.com/110/a-trillion-is-a-large-number-12-zeros/trackback/

Earlier, I had documented my experience in testing Word docs to HTML conversion. As the time was approaching to actually do that with a huge 42 pp post, I began to put that process in play. I again discovered it was kludgy, went back to the drawing board, and refined my process and steps. This post updates this new process. Though it has many steps associated with it, it works and is quite clean.

When to Convert

As the earlier post noted, this procedure should ONLY be used for longer, complicated documents that have already been created in Word. (It applies to Excel spreadsheets, as well, whether straight from Excel or embedded in Word.)  There are thus four ways I use to create content for AI3:

  • Large, existing Word documents (most often produced for other purposes), for which I use the process documented here.  The reference document used in this example is DocName.doc
  • Short, existing Word documents, which I save as text and then final format within WordPress using the Xinha WYSIWYG editor
  • Large, new postings (most with complicated things like tables, etc.), which I compose offline using the Nvu WYSIWYG HTML editor (see below), and then import under the Prepare to Post sections below, and
  • Short, new postings, which I compose directly within the WordPress administration center using Xinha.

Thus, assuming we are in the first or third categories, here are the revised steps for Word doc converstions and postings.

Create Original Word Document

  1. Create the Word doc as normal
  2. When completely finalized, create as a “special” HTML-ready version. That is, reduce unnecessary styles, move footnotes to endnotes, remove repeated page headers and footers, or eliminate anything else extraneous that may make sense in a multi-page Word or printed document, but not as a Web page
  3. Save As the document using the Web Page, Filltered option. Give the document a logical name similar to the original, but include HTML in the name to distinguish it (for example, DocNameHTML.html). This is also the version you may need to return to should you have to go back to square one in this conversion process.

Cleanup Word HTML

You are now ready to stage the document for posting. The first phase is to cleanup the ugly HTML created by Word.

  1. Create an account with Textism for the Word HTML Cleaner. The service charge is minimal (~$6 for 24 hrs or ~$25 per year) and it does a fantastic job of stripping down to essential HTML and formatting the code for readability
  2. Submit the file to the Textism service
  3. Cut-and-paste the resulting clean version to your local drive; give the new document a logical name similar to the original, but include Clean or some other standard designator to distinguish it (for example, DocNameClean.html).

Edit HTML into Final Form

Assuming you want to make final formatting changes for what appears on your site, such as for example final table formatting and the like, you now need to edit the document into its final presentation look. You will need to use a WYSIWYG HTML editor or composer. In my previous post on this subject, I used Mozilla’ Composer. Most recently, I have been trying out the Nvu (“N-view”) editor, which is a new branch from Composer by Daniel Glazman for Linspire. (Though there are a couple of frustrations with the product such as using body text rather than paragraph as the default style and that insidious problem of inserting line breaks shared with Composer, it is an advancement from Composer that looks to be heading in a great direction.) (The Nvu user guide is also much better than that for Composer.) Thus the edit steps are:

  1. Use the editor to make all final HTML and formatting changes. Because of steps to follow that are a pain to repeat, remain at this step until the document looks exactly as you want it with final edits. If, per chance, you look at your document at this stage in WordPress, you may see funky line breaks and some other minor problems (addressed below). Don’t worry about them now, they will be cleaned up in the last steps
  2. Besides formatting, you may want to look for and remove items such as excess anchor tags (Word cross-referencing can introduce more than desired), caption and other style-specific entries, etc.
  3. You will also need to provide image references relative to your site. Click on each image and in the image dialog provide a link path similar to (for my site) https://www.mkbergman.com/wp-content/themes/ai3v2/images/more/moreless/imageXXX.gif, and make sure you have set a checkbox if it is there to URL is relative to page location. Of course, using this approach means you have already placed the referenced images in the path location so indicated
  4. When editing is complete, save the document using a logical name similar to the original, but include Format or some other standard designator to distinguish it (for example, DocNameFormat.html)
  5. And, because of the next step, you may need a text version. Thus, after saving the HTML version, save another version using the same name but with the .txt extension (for example, DocNameFormat.txt)

Prepare to Post

We are now at the final steps to remove some of the problems created because of the quirks in previous tools. If you use a different set of tools or perhaps emphasize different elements (such as forms) in your HTML, you may have slightly different steps that what I outline below. Also, I use MS Word as the final cleanup editor because 1) we began with Word doc problems; and 2) Word has the global search-and-replace (S & R) capabilities and tab and paragraph recognition abilities needed for these steps. Any other text editor that has these capabilities may be substituted. (Note. we needed to name our file as a .txt because Word infers formatting based on extension; other text editors can handle html extensions without this problem.). Thus the final preparation steps are:

  1. Open Word and make sure you turn on the show paragraph (¶) option; it acts to display paragraph, tab and spaces, useful for determining S & R patterns
  2. S & R first step for line breaks:  Replace </p>^p –>  </p>@ (the </p> is the actual HTML paragraph end or break, the ^p is the line break symbol, the @ sign is used temporarily as a pattern for later replacement)
  3. S & R second step for line breaks:  Replace ^p –> [single space] (don’t enter the square brackets, simply the single space. This step removes the insidious inserted line breaks and re-instates proper spacing)
  4. S & R third step for line breaks: Replace </p>@ –> </p>^p^p (this now re-instates the line break at the correct paragraph end and adds an extra break for code readability)
  5. S & R for bullet replacements may need to find HTML patterns created in previous steps that introduce funky characters. In my documents, I often see this symbol (§) as a replacement for the Word bullet, which is shown by the HTML of &sect;. Since the pattern I see is &sect;[single space], I replace that with null. Depending on the bullet type you use in Word, you may see different patterns
  6. S & R other changes as necessary
  7. Then, save the document under a logical name similar to the origiinal, but add Post or some other standard designator (for example, DocNamePost.txt).

Post Final

You are now ready to post to WordPress. To do so:

  1. Remove the first and last line from your DocNamePost.txt file. These are HTML header and body statements. At the top of the file, remove everything up to and including <body>; at the bottom of the file remove everything after and including </body>
  2. Select all and copy
  3. Finally, within the WordPress Write section, paste into the text area. If you are using a WYSIWYG editor, make sure you are using code view (< >) when you paste
  4. Publish or save as a draft.

Voilà, you are done.

Note that the various versioins created during this process enable you to return to any part of the process and make revisions from there.  However, should you need to make major changes to the content after you have posted it to WordPress,  you may be better off deleting the entire post and then re-creating a new one prior to re-posting. This saves update time for some reason.

Author’s Note: I actually decided to commit to a blog on April 27, 2005, and began recording soon thereafter my steps in doing so.  Because of work demands and other delays, the actual site was not released until July 18, 2005.  To give my ‘Prepare to Blog …’ postings a more contemporaneous feel, I arbitrarily changed posting dates on this series one month forward, which means some aspects of the actual blog were better developed than some of these earlier posts indicate.  However, the sequence and the content remain unchanged.  A re-factored complete guide will be posted at the conclusion of the ‘Prepare to Blog …’ series, targeted for release about August 18, 2005.  mkb

Posted by AI3's author, Mike Bergman Posted on July 27, 2005 at 11:41 am in Blogs and Blogging, Site-related | Comments (0)
The URI link reference to this post is: https://www.mkbergman.com/99/preparing-to-blog-word-docs-to-html-ii/
The URI to trackback this post is: https://www.mkbergman.com/99/preparing-to-blog-word-docs-to-html-ii/trackback/
Posted:July 26, 2005

Though certainly not required, in keeping with my interest in embracing the full scope of blog standards and techniques I decided to get W3C (World Wide Web Consortium) certification for the validation of my site XHTML. I had done so earlier from my cascading style sheets (see earlier post) and had verified through the W3C validator that the WordPress site, itself written in WordPress, had valid XHTML. If any errors occurred on my own site, these indicators suggested that they were only introduced by me.

Why XHTML Validation?

The W3C validator checks for valid XHTML 1.1, which means the site identifies itself as "XHTML 1.1" and that W3C successfully performed a formal validation using an SGML or XML Parser (depending on the markup language used). Passing this test shows readers that you have taken the care to create an interoperable Web page, you may therefore display the W3C XHTML validation icon on any page that validates.

XHTML validation suggests that your site and its code meets current standards and will likely render and display properly in modern browsers. By giving attention to these factors early, effort in later post-cleanup are greatly reduced. (Though it is the case that dynamic sites that are template driven are easier to cleanup than static sites where mistakes are repeated on every HTML page.) I was also interested in the validation because of my assigned scope to get familiar with the entire blog and current environment.

What Initial Testing Showed

The first validation test on the AI3 entry page showed 284 errors. After checking further to remove duplicated errors resulting from the main display posting-and-comments loop, I found there to be about 142 errors in the main page template, which included the cascading includes of header, masthead, left- and right-hand panels, and main display area, which displays the results of the WordPress loop. Here is where I would first turn my attention, then followed by the loop errors.

In general, here are the types of repeated errors I had made:

  • A lack of full close tags (__/) v. (/item) for elements such as link and image tags and line breaks
  • Sloppy definitions of color and other parameter definitions that were not included in quotes (e.g., color="#820000" v. color=#820000).  All of these were subsequently quoted; this is an important area to be attentive for future entires
  • Place alt tags on all image references and elements
  • Avoid the older italic (<i>) and bold (<b>) tags, using instead <em> (emphasis) and <strong>, respectively
  • Replace the old style line break (<br>) with the new style closed break (<br />), and avoid breaks where open and close paragraphs can be used instead (<p> paragraph body </p>>)
  • If using open and close paragraphs for spacing, make sure a space is included between the tags (<p>&nbsp;</p>)
  • Take care when using <div> tags and make sure they are even and balanced with equal number of closes (</div>).  This problem in particular caused display differences within MSIE and some temporary hacks that could later be removed when the div tags were balanced.

Efforts to Cleanup Errors

The efforts to identify and cleanup these errors took about six hours. After a short period spent understanding  the cryptic messages from the W3C validator, the errors began to fit into patterns and corrections occurred more quickly. Also, here were some of the lessons learned:

  • Except for very targeted and limited use of in-line styles, use external CSS where possible
  • On the validator, set to verbose comments to get more errror descriptions
  • Re-submit validations frequently as various parts of the code are cleaned up.  This reinforces lessons learned and provides gratifying feedback
  • Be careful about the use of in-line v. block elements, and make sure block elements embrace in-line ones.  For example, bold is an in-line element.  It should be used internal to a block element tag such as paragraph.  The following is correct syntax:  <p><strong>This is a bolded paragraph.</strong>,/p>.  Reversing the order of <p> and <strong> is incorrect syntax
  • IInspect the WordPress (or other blog software source) code for internally named classes and give them particular care in the CSS, adding if necessary and using where possible, and
  • Avoid all use of the older <center> text body </center> style.

Resulting Testing and Validation of the Site

When the cleanup was completed, most pages within my site validated, especially the static ones and postings based on the WordPress loop.  I had some particular problems with the PHP calls for the trackback mechanism when the reference was within link tags (<a href="item" /> <?php trackback stuff>Trackback<a />).  By single quoting the reference, I was able to clear up this nasty error.

I have found a couple of places where my posts will not validate.  These point to errors within the WordPress PHP code and when encountered I have chosen not to make the cleanup.  This is based on my desire to not alter or hack basic WordPress code that might change in future versions and cause integration problems with my prior hacks. 

Use of Valid XHTML Icon

Taking this effort and cleaning up the code enables you to display the valid XHTML 1.1 icon: 

Valid XHTML 1.1!


Author’s Note:  I actually decided to commit to a blog on April 27, 2005, and began recording soon thereafter my steps in doing so.  Because of work demands and other delays, the actual site was not released until July 18, 2005.  To give my ‘Prepare to Blog …’ postings a more contemporaneous feel, I arbitrarily changed posting dates on this series one month forward, which means some aspects of the actual blog were better developed than some of these earlier posts indicate.  However, the sequence and the content remain unchanged.  A re-factored complete guide will be posted at the conclusion of the ‘Prepare to Blog …’ series, targeted for release about August 18, 2005.  mkb

Posted by AI3's author, Mike Bergman Posted on July 26, 2005 at 10:56 am in Blogs and Blogging, Site-related | Comments (0)
The URI link reference to this post is: https://www.mkbergman.com/92/preparing-to-blog-w3c-xhtml-validation/
The URI to trackback this post is: https://www.mkbergman.com/92/preparing-to-blog-w3c-xhtml-validation/trackback/
Posted:July 25, 2005

Since I have an interest in including images in some posts and providing PDF or spreadsheet downloads in others, how should that stuff be organized, named and referenced within my directory structure? While, of course, there are innumerable ways to handle these questions, here is the approach I have undertaken and refined, with some rationale for each.

File Organization

Under my WordPress theme directory (AI3), I have set up separate subdirectories for files and images. Under each of those subdirectories, I have set up a number of parallel subdirectories:

  • PaperName — wherein the ‘papername’ is set up for long, complicated posts
  • Posts2005 (etc.) — all files or images for other posts are placed under this subdirectory. I chose to use the year designator knowing that the volume of my posts and associated files and images will require at least that level of granularity. Should too many files be placed in these directories, I may move to a quarterly designator in future years as well
  • All images are placed under the images branch; all files (PDFs and XLSs, etc.) are placed under the files branch.

File Naming

I have three objectives for my naming conventions:

  1. Enable files or images to be sorted in a logical order
  2. Enable files or images to be clustered within their parental post
  3. Provide some logical component in the name to identify the content of the file or image.

To achieve these objectives, I construct a four-part name:

datestampsequence_logicname.extension

The datestamp is provided in YYMMDD format. This order is used because it enables proper sorting in file managers or Open and Save dialogs. The sequence is simply an alphabetical sequence to account for potentially multiple posts within a given day. Most will obviously have the a sequence; rarely will there be more than a b to d in the sequence. The logicname is the content designator and is prefaced by an underscore for readability. (If there are multiple words in the logicname, I also initial cap with no spaces for readability and to save space.) For example, longer posts may have multiple images embedded in them; the logicname simply allows quick choices among these multiples. Lastly, the extension simply conforms to the file type.

Thus, a logo GIF included in my second post of June 25, 2005, could have an HTML reference in the post somewhat like (without angle brackets):

img src="https://www.mkbergman.com/wp-content/themes/ai3v2/images/050625b_MyLogo.gif"

Note the first part of the path is a contextual reference to the subdirectory location on the server.

A sorted directory listing may also look somewhat as follows, with all related items properly sequenced and clustered:

050625a_PriceChart.gif
050625b_BarbLogo.gif
050625b_JoeLogo.gif
050625b_MyLogo.gif
050627a_Revenues.jpg

Using these techniques provides uniformity of referencing within my posts and a quick, known path for getting to and identifying every file and image available.


Author’s Note:  I actually decided to commit to a blog on April 27, 2005, and began recording soon thereafter my steps in doing so.  Because of work demands and other delays, the actual site was not released until July 18, 2005.  To give my ‘Prepare to Blog …’ postings a more contemporaneous feel, I arbitrarily changed posting dates on this series one month forward, which means some aspects of the actual blog were better developed than some of these earlier posts indicate.  However, the sequence and the content remain unchanged.  A re-factored complete guide will be posted at the conclusion of the ‘Prepare to Blog …’ series, targeted for release about August 18, 2005.  mkb

Posted by AI3's author, Mike Bergman Posted on July 25, 2005 at 9:08 am in Blogs and Blogging, Site-related | Comments (2)
The URI link reference to this post is: https://www.mkbergman.com/90/preparing-to-blog-file-organization-and-naming/
The URI to trackback this post is: https://www.mkbergman.com/90/preparing-to-blog-file-organization-and-naming/trackback/
Posted:July 24, 2005

As I get near to releasing my site, I began asking colleagues to provide feedback. It was then that I learned that the site was not displaying well in Internet Explorer, and only slightly better in Opera. I typically do all of my development and Internet use with Mozilla (1.7.6 at present). This post shows what was wrong and what I’ve learned.

Examples of the Challenge

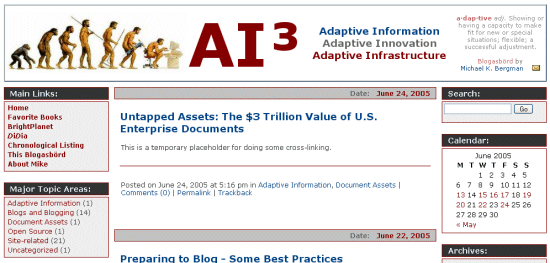
Depending on how the style sheet is written, you can have major problems with cross-browser display. For example, here is the screen shot as represented in Mozilla (Firefox displays similarly) (~45% reduced size) prior to my giving this issue attention:

Note the display is not too bad, since I develop using Mozilla.

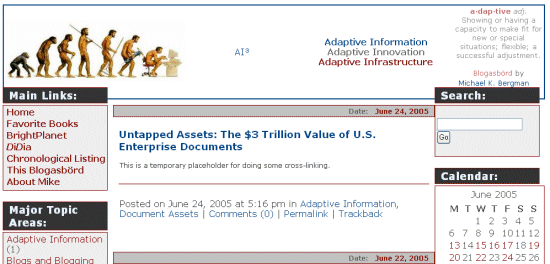
However, when I brought the same page up with Internet Explorer, suddenly everything was screwed up!!@$^&* Here is the same size screen shot of the same page in Internet Explorer:

Note that fonts are of greatly different sizes and the layout registry is messed up with overlaps, etc. How do we fix this stuff?

Some Cross-browser Analysis

Cascading style sheets (CSS) and browser support are of relative late vintage. Today, most modern browsers (Netspace past v. 4; IE past v. 5-6; Mozilla past v. 1.6; Firefox; Opera past v. 7; Safari past v. 1) have generally good conformance to standards, but there are some differences. Discrepancies with IE tend to be the greatest, though Microsoft has made strides in better compatibility. For browser comparisons, see further here.

Discrepancies tend to deal mostly with font sizing and treatment, tables and display, and various degrees or not for forgiving older HTML designs. To overcome these issues, users and experts tend to take one of three approaches (or combinations thereof) (a general, useful intro on style differences and browsers is provided by
Code Style):

  1. Very careful attention to cross-browser CSS syntax;
  2. Browser detections with swap outs of replacement styles in other CSS with the browser-specific syntax (for arguments supporting this approach using @import, see Stylegala or Avoiding Hacks. A more definitive treatment of different style sheets for swapping is provided by the Site Wizard;
  3. CSS “hacks” or filters that use browser tricks or quirks to set branching and choice conditions for different browsers. The definitive expert in this field and the discovery and developer of many of these techniques is Tantek Celik, now at Technorati;
  4. And, avoidance of browser-incompatible CSS.

Since the latter option eliminates too many options, I will not discuss it further.

In general, because browsers are constantly upgrading, experts recommend NOT making style adjustments within actual Web pages. Use of external style sheets enable global changes and quicker, more consolidated updates and changes.

I am by no means a CSS expert, and, like previous posts, there is a dearth of central information on these topics anyway. However, I did discover that the biggest incompatibiily I had for my own site were for font treatment between IE and the Gecko (Mozilla/Firefox) browsers (tables and padding were a big problem prior to IE v. 6 as well ).

Font Treatment

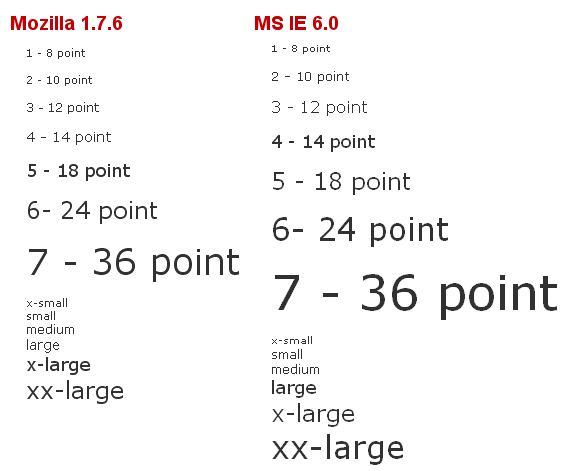
Text for the screen is sized with CSS using either pixels, ems, percentages, size numbers or keywords. Though pixels appears precise, IE does not handle re-sizing well with it. em is a precise measure that has fewer issues. Different browsers use diffierent sizing conventions for keywords (such as small, medium and large). This example shows that both keywords and size numbers are not handled equivalently by “modern” browsers:

The main problem shown in the screen captures at the top of this post is a mismatch in font sizes between Mozilla and IE; most of the layout problems cascade from these font size differences. My investigations suggest there are two main reasons for this:

  • First, many recommend specifying the font-size attribute as a percent value because it maintains the differences users set within their own browsers. Percent values are OK in elements that are inherited, but if used for the base font definition in a style sheet, (p and body, for example), this exacerbates the inherent differences in the default font sizes used by browsers. IE 6, for example, uses a different default font size than Mozilla 1.7 (see above). If you instead set p and body as, say, 12 px, that equalizes the starting points and later percent differences from that baseline will be adequately reflected.
  • Second, there appears to be greater discrepancy in how id and class are handled. To be safe, I have moved to embed style or heading differences where fonts are involved from the normal baseline by enclosing them within div tags.

Finally, for a nice tutorial on fonts and CSS, I encourage you to see the 2003 one by Owen Briggs at the Noodle Incident.

Author’s Note: I actually decided to commit to a blog on April 27, 2005, and began recording soon thereafter my steps in doing so.  Because of work demands and other delays, the actual site was not released until July 18, 2005.  To give my ‘Prepare to Blog …’ postings a more contemporaneous feel, I arbitrarily changed posting dates on this series one month forward, which means some aspects of the actual blog were better developed than some of these earlier posts indicate.  However, the sequence and the content remain unchanged.  A re-factored complete guide will be posted at the conclusion of the ‘Prepare to Blog …’ series, targeted for release about August 18, 2005.  mkb

Posted by AI3's author, Mike Bergman Posted on July 24, 2005 at 7:11 pm in Blogs and Blogging, Site-related | Comments (1)
The URI link reference to this post is: https://www.mkbergman.com/89/preparing-to-blog-cross-browser-compatibility/
The URI to trackback this post is: https://www.mkbergman.com/89/preparing-to-blog-cross-browser-compatibility/trackback/